
Installing SUSE LINUX Enterprise Server 9 on the Intel Itanium 2 Processor Family


2 Installing from Media
This chapter describes the procedures for beginning the installation process.
NOTE: This chapter presents a brief summary of a basic SLES 9 installation using the SLES 9 CDs. There
are other installation methods available, such as a network installation, which are beyond the scope of this
document. Detailed SLES installation information is available from Novell, from the following web site:
http://www.novell.com/documentation/suse.html
This document describes the installation process using the YaST graphical user interface using a VGA console.
You can also install SLES using a serial console. The sequence of installation steps is the same regardless of
the method used.
Starting the Installation
You begin the SLES installation using the Service Pack CD1.
1. Insert the SLES 9 Service Pack CD1 in the CD drive of your system.
2. Power the system off and on to reboot the system.
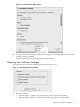
3. Select the “Boot Option Maintenance” menu from the EFI Boot Manager, and select “Boot from File.”
4. Find your CD or DVD device and select it.
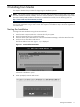
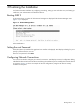
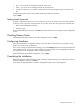
The Itanium Edition boot menu (Figure 2-1) is displayed.
Figure 2-1 Itanium Edition Boot Menu
Choose the “Installation” option.
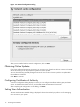
5. When prompted, insert the SLES 9 CD1.
Starting the Installation 11