
HP OSMS Blueprint: HP Manageability Value-Add Software for Open Source Middleware Stacks
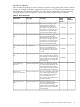


Figure 6 MySQL Replication Configuration
This replication scheme can offer one key advantage, which is that backing up the database is
easier and safer. A slave server can be taken off line and all of its data can be backed up without
impacting the overall operation of the live database. During backup, the master server and other
slave servers continue responding to queries uninterrupted. When the backup is complete, the
backed-up slave server is brought up to date with any changes that have occurred during the
backup, and then the slave server is returned to normal operation. In this section the backup is
performed based on the MySQL replication configuration.
Installing and Configuring a Database Backup Tool
The following section shows you how to use the HP Data Protector for testing purposes. In this
example, the Data Protector Cell Manager and agent are installed separately on one machine
running Windows and on the Linux-based MySQL slave server.
Before performing the following test, install the Data Protector 6.0 server on a Windows system.
Use the following steps to install and configure the Data Protector 6.0 Agent.
1. To install HP Data Protector for Linux Agent on the Linux-based MySQL slave server,
download the HP Data Protector for HP-UX PA-RISC - Installation Server 1 of 2 (CD ISO
image) from the following website: http://h20229.www2.hp.com/downloads/evals.html
2. Open the image and enter the following command:
# ./omnisetup.sh -install da
3. Edit the /etc/services file and comment out all the lines containing port 5555 by
making the following changes:
# personal-agent 5555/tcp # personal Agent
# personal-agent 5555/udp # personal Agent
4. To start the Data Protector agent, enter the following commands:
# chkconfig xinetd on
# /etc/init.d/xinetd restart
Backing Up Your MySQL Using HP Data Protector 21