
HP OSMS Blueprint: Database Server on HP Server Platforms with MySQL and RHEL5
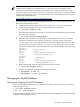

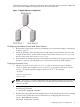

load-balancing strategy is effective in situations where read-only queries dominate. Additional
slave servers can be added as needed to meet an increase in demand.
Figure 5 MySQL Replication Configuration
Configuring the Master Server and Slave Servers
1. Download the appropriate version of the MySQL server and client packages, as displayed
in Table 1 (page 7).
2. Install the packages on the systems you use as the master server and slave server. For the
example in this section, assume the host name of the master server is master.test and
the host name of the slave server is slave.test.
3. Perform the basic configuration steps, as described in “Installing and Configuring the MySQL
Database ” (page 8), so the MySQL server can be started correctly on both machines.
Configuring the Master Server
1. Edit the [mysqld] section of the /etc/my.cnf file on the master server to include a
log-bin option. Also include a server-id=master_id option in this section, where
master_id must be a positive integer value from 1 to 2
32
-1. For example:
[mysqld]
log-bin=mysql-bin
server-id=1
NOTE: The server-id value configured in this step must be unique to each server in the
replication configuration. No two slave servers or the master server may have the same
server-id value.
2. Restart the MySQL server on the master server, and make sure no errors occurred by entering
the following command:
# /etc/init.d/mysql restart
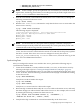
3. Run the following command in the MySQL client to verify that the master server is running
correctly, and to gather the necessary information for configuring the slave servers:
mysql> show master status;
The sample output looks as follows:
Configuring MySQL Server Replication 17