HP Open Source Middleware Stacks Blueprint: Database Server on HP Server Platforms with MySQL and SUSE Linux Enterprise Server Version 10 HP Part Number: 5991–7432 Published: August 2007 Edition: 2.
© Copyright 2007 Hewlett-Packard Development Company, L.P. Legal Notice Confidential computer software. Valid license from HP required for possession, use or copying. Consistent with FAR 12.211 and 12.212, Commercial Computer Software, Computer Software Documentation, and Technical Data for Commercial Items are licensed to the U.S. Government under vendor's standard commercial license. The information contained herein is subject to change without notice.
Table of Contents Introduction............................................................................................................................................5 Executive Summary...........................................................................................................................5 Intended Audience............................................................................................................................5 Scope and Purpose......................................
Introduction Executive Summary HP Open Source Integrated Portfolio (HP OSIP) comprises a range of products and services designed to ensure that customers can successfully realize the cost and feature benefits of adopting open source software in their IT environments. This document provides general instructions for installing and using a MySQL database server with a SUSE distribution.
HP Open Source Database Server Stack Stack Components The MySQL database server stack was tested using the MySQL Network Pro Certified binaries running on the SLES10 distribution, and it contains the components listed in Table 1. NOTE: The instructions in this blueprint are tested and validated using the MySQL Network Pro Certified binaries, which include professional support and service from HP.
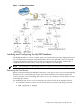
Figure 1 Hardware Environment Installing and Configuring the MySQL Database The MySQL Database is a robust, scalable, open-source product that provides a high-performance, low-cost, SQL-based enterprise relational database. This section describes how to install and configure the MySQL database server on HP server platforms with SLES10. Additionally, a sample database is created, and is used in all the examples in this blueprint.
2. If an older version of the MySQL software exists, remove it by entering the following command: # rpm –e package_name NOTE: Because dependent relationships exist between RPM packages, you might encounter errors such as error: Failed dependencies. If this error message is displayed, you must first remove the dependent packages before proceeding with removal of the MySQL software. Installing MySQL Install all the MySQL components listed in Table 3 using the appropriate version, displayed as 5.0.40-0.
1. To assign a password to the root account, enter the following command: # mysqladmin -u root -p password 'your_password' NOTE: The MySQL database maintains its own user names and passwords, distinct and separate from the Linux operating system’s users and passwords. Therefore, the MySQL root user account is not the same as the Linux system root account, and to enhance system security, should not use the same password. 2. To specify other MySQL configurations, use a configuration file.
NOTE: Storage Area Networks (SANs) provide flexibility in system management, configuration, connectivity, and performance to meet the needs of changing business environments. The HP StorageWorks SAN architecture provides open network storage solutions for all sizes and types of businesses, including small to large IT departments and enterprise environments. For more information about SAN solutions from HP, see the HP SAN Infrastructure website at: http://h18006.www1.hp.com/storage/saninfrastructure 4.
NOTE: If you have a large amount of data, shutting down the database might take several minutes. # /etc/init.d/mysql stop # ps –ef | grep mysqld Creating and Deleting the MySQL Database In this section, you create a database, delete a database, and add a table. 1. Use the mysqladmin command to create a database. For this example, create a database named osmsdb by entering the following command: # mysqladmin –u root –p create osmsdb 2. 3. At the prompt, enter the MySQL root password.
NOTE: In general, should set up a new account for any user or application that accesses the MySQL server. This allows different users to have access to only the specific databases and tables they need. Setting Up a New Account 1. Start the MySQL command-line client by entering the following command: # mysql –u root –p 2. 3. At the prompt, enter the MySQL root password.
2. To grant privileges to a database user account, use the following command: mysql> grant all privileges on database.* to username@'hostname' \ identified by 'password' ; For example, enter the following: mysql> grant all privileges on osmsdb.* to osmsuser@'%' \ identified by 'osmspass' ; NOTE: The preceding command grants access to any table in the osmdb database for the user osmsuser@% with the password osmpass, connecting from any host name.
Figure 3 Checking Extended Status Values Creating the Sample Database for MySQL To perform the tests in this blueprint, you need a sample database that uses multiple storage engines and is already populated with sample data. Use the following procedure to create the sample database: 1.
3. Import the script by entering the following command: # mysql –u root –p < osmsample.sql 4. At the prompt, enter the database password. The following results are displayed: # mysql -u root -p < osmsample.
Figure 4 MySQL Replication Configuration Configuring the Master Server and Slave Servers 1. 2. 3. Download the appropriate version of the MySQL server and client packages, as displayed in Table 1 (page 6). Install the packages on the systems you use as the master server and slave server. For the example in this section, assume the host name of the master server is master.test and the host name of the slave server is slave.test.
| mysql-bin.000001 | 1678 | | | +-----------------------+-----------+-------------------+------------------------+ 1 row in set (0.00 sec) This output shows that the MySQL server is using mysql-bin.000001 as its binary log file. The current log position in the log file is 1678. The values of Binlog_Do_DB and Binlog_Ignore_DB are not configured. Record the name of the binary log file and the current position because these values are needed when you configure the slave servers. 4.
NOTE: In this example, specify the replication user account that you created, the master log file name, and the log position that you recorded previously from the output of the show master status command on the master server. 4. Start the slave threads, which initiate the master/slave server connection, by running the following command on the slave server: mysql> start slave; 5.
Monitoring Replication Status 1. Run the following command on the master server to display the status: mysql> show master status\G The file name and position of the bin log file that the master server is using are displayed: *************************** 1. row *************************** File: mysql-bin.000003 Position: 98 Binlog_Do_DB: Binlog_Ignore_DB: 1 row in set (0.00 sec) 2.
4.
• • long a given slave server is taking to service requests, whether a particular network path is congested, or how the query load is changing over time. Hardware load balancer—A hardware load-balancer is dedicated, custom-built hardware, sometimes referred to as an application switch, which is capable of directing large volumes of specific application traffic simultaneously over multiple network paths.
MySQL High Availability Using HP Serviceguard Introduction to HP Serviceguard and MySQL Toolkit HP Serviceguard is specialized software for protecting mission-critical applications from a wide variety of hardware and software failures. The MySQL toolkit for HP Serviceguard consists of a set of shell scripts used by a package control script to start, stop, and monitor the MySQL server package.
Logical Volumes: PV Name LV Name VG Name LV Size Mount Point Filesystem Type /dev/sdx2 /dev/vg/lv /dev/vg 50.00 GB /mysql ext3 For more information about Lock LUN, see Managing HP Serviceguard for Linux located at: http://docs.hp.com/en/B9903-90046/index.html • You have installed SG/LX on all the nodes that are included in the cluster. For more information on this installation, see Managing HP Serviceguard for Linux at: http://docs.hp.com/en/B9903-90046/index.
This output demonstrates that the MySQL client running on the test machine is able to connect to the primary node of the MySQL Serviceguard cluster using the relocatable IP address. Testing the Cluster Stability The MySQL-bench tool is useful for performing general comparisons of servers and configurations. Use this tool to perform the stress tests described in this blueprint. In the following test, a sample database is created and populated with benchmark data.
"HP SG/LX with MySQL 5.0.40 enterprise gpl log" --log --use-old-results Check the results located in output/RUN-mysql-Linux_2.6.18_8.el5_x86_64. If the test passed, the following message is shown: All 9 test executed successfully Testing Cluster Failover You can simulate some of the following cases, which cause primary-node failure, to verify the MySQL Serviceguard cluster failover function.
Figure 6 HP OVOW Architecture Software Prerequisites and Reference Guides Before attempting to install the MySQL SPI, ensure that you have a functional HP OVOW installation, including the OVOW Management Console and the Linux OVOW SPI agents for the MySQL server. An HP-UX OVO installation can be used instead. However, this example uses the Windows version.
Table 5 Application Labels and Descriptions Application Label Description Configure MySQL Instrumentation Extracts and deploys MySQL Instrumentation. Restart MySQL Server Restarts the MySQL server. Start MySQL Server Starts the MySQL server on the managed node. Stop MySQL Server Stops the MySQL server on the managed node. Start MySQL Log File Monitoring Starts the log file monitoring of the MySQL server.
Table 6 MySQL Policies in the DBSPI MySQL Policy Group (continued) Policy Name Policy Type Description Default Polling Interval Default Threshold MySQL Service Service Auto Discovery Discovers the MySQL server. The Discovery - MySQL SPI MySQL server is registered as an OVOW service and this policy is used to “discover” MySQL availability once an hour, by default. N/A N/A Log Message – MySQL Open Message Interface Provides an interface for displaying SPI MySQL server log messages.
5. Import the MySQL slave server as a client of the Data Protector Cell Manager as shown in Figure 7. Figure 7 Importing a Client Backing Up Data There are two parts to backing up your data: first, the extraction of data from the database and, second, the integration of the database back up tool into the process. To Extract Data from the Database 1. To stop the slave replication, enter the following command: mysql> STOP SLAVE SQL_THREAD; 2.
NOTE: To identify the type of storage engine used for a particular table, use the following command: mysql> show table status from osmdb like 'customer'; 4. Restart the slave replication thread after the database has been dumped by entering the following command: mysql> START SLAVE SQL_THREAD; To Integrate Data Protector 1. 2. Add the secondary storage, which is used to hold the backup data, as a device in Data Protector.
Restoring Data Restore the data file and binary log files to both the master server and slave server. All database data is recreated using the extracted data file and the binary log files. 1. 2. Stop the replication between master server and slave servers. See “Configuring MySQL Server Replication” (page 15) for instructions. Restore the latest database data file and binary log files to both master server and slave server using Data Protector. Figure 9 Restore Files 3.
The SLES10 distribution also contains MySQL connectors to enable Perl, Python, and PHP, but they are outside the scope of this document. Table 7 lists the MySQL connectors that are available as part of the HP Open Source Middleware Database Server Stack. Table 7 Available MySQL Connectors Connector Name Description Notes Connector/J Standard connector for accessing MySQL from Java applications, including the JBoss None and Tomcat application servers. Yes Connector/.NET Connector for Microsoft .
5. To enable MySQL data sources in Tomcat, create a file named context.xml using your favorite text editor. This file should be located in $TOMCAT/webapps/osmsexample/META-INF/context.xml and should consist of the following lines: PAGE 34Context localCtx = (Context) initCtx.lookup("java:comp/env"); myDataSource = (DataSource)localCtx.lookup(dsName); con = myDataSource.getConnection(); preStmt = con.prepareStatement("INSERT INTO employee(depno,name,cardnumber) values(?,?,?)"); preStmt.setInt(1,99); preStmt.setString(2,"Peter"); preStmt.setInt(3,99999); preStmt.executeUpdate(); }catch (SQLException s){ out.println("
SQL Error:"+s.getMessage()+"
"); }finally{ try{ preStmt.close(); con.close(); }catch(Exception e){ out.
NOTE: The following section appears at the beginning of the list.jsp file: //read-only data source //String dsName ="jdbc/roDS"; //read-write data source String dsName ="jdbc/rwDS"; These lines define the data source, which will be used to connect MySQL server. The string name jdbc/roDS is for read-only data sources and the string name jdbc/rwDS is for read-write data sources. 8. Perform a read-write test on the data and verify the following: • The list.
Figure 11 Employee Records List—Read-Only Test For more information about the Tomcat data source, see the JNDI Datasource How-To web page located at: http://tomcat.apache.org/tomcat-5.5-doc/jndi-datasource-examples-howto.html Installing the MySQL Connector/.NET Application The .NET applications can access data from MySQL using the MySQL Connector/.NET application, which implements the required ADO.NET interfaces.
Figure 12 Microsoft IIS Manager 2. Create a virtual directory in the default website that points to the local directory containing the OSMS MySQL Connector/.NET test application codes. As displayed in Figure 13, the virtual directory is mysql-connector-net and the corresponding local directory is e:\osm\mysql .net connector. Figure 13 Create a Virtual Directory 3. Run the default website in IIS. Configuring the MySQL Connector/.NET Application MySQL Connector/.
• • • MySqlConnection MySqlDataAdapter MySqlDataReader Based on these classes, developers can build applications using their choice of .NET languages. For more information on MySQL Connector/.NET, see the MySQL 5.0 Reference Manual located at: http://dev.mysql.com/doc/refman/5.0/en/connector-net.html Use the following steps to configure MySQL Connector/.NET. 1. Download and install MySQL Connector/.NET. The package can be downloaded at: http://dev.mysql.com/downloads/connector/net/5.0.html 2.
MySQL Connector/ODBC MySQL Connector/ODBC provides access to a MySQL database using the industry-standard Open Database Connectivity (ODBC) API. This access is particularly useful when you use data from a MySQL database within a Microsoft Windows application. For example, database queries can be executed, and the results can be presented as rows and columns in a Microsoft Excel spreadsheet.
1. 2. Open the External Data tool bar in Microsoft Excel. Select the data fields you previously imported from MySQL to Microsoft Excel, and then select Edit Query. The Microsoft Query dialog box is displayed. 3. Enable record editing by selecting Records→Allow Editing from the main menu, as displayed in Figure 15. The edits you perform in Microsoft Query are reflected in the MySQL database.
Frequently Asked Questions Q: What do I do if any of the following errors display in the OVOW console during the SPI or instrumentation deployment phase? • Error:Action could not be executed because the contacted managed node is using an AgentId different to the AgentId the action server expected • Error:Node is already managed by another management server A: If you are having issues with the nodeId, use the following procedure: 1.
A: This error indicates the groupid is being used by another application. In your environment, the application is the OVOW agent. To solve this problem, uninstall the OVOW agent and then install HP SIM. When the OVOW agent is reinstalled, the OVOW agent automatically uses a different groupid number.