
HP StorageWorks P4000 G2 Series Upgrade to 10 GbE Hardware installation instructions (AX705 96001, February 2010)
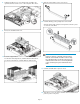

15. Once the cover is attached to the chassis, tighten the screw on the
top cover with a T-10 wrench.
16. Place the storage node back in the rack, connect the Ethernet cable,
and power on the storage node.
Upgrading the software
Upgrading software on P4000 G2s that are
in a management group
Continue with the software upgrade instructions in the 1-Gigabit to
10-Gigabit Ethernet Migration Instructions.
Upgrading software on P4000 G2s that are
new and/or not in a management group
1. Open the CMC and find the P4000 G2.
2. Log in to the storage node you want to upgrade.
3. Click Storage Node Tasks on the Details tab and select Install
Software.
The Install Software window opens.
4. From the list, select the storage node that you want to upgrade. Use
the CTRL key to select multiple storage nodes to upgrade from the
list.
5. Select the radio button: Install file on selected nodes one at a time
(Recommended).
6. Click Browse to navigate to the folder where you copied the patch
file.
7. Select the file and click Open Install File.
Focus returns to the Install Software window. When the file name
is present, the Install button becomes enabled.
8. Review the version and description to be sure that you are using
the correct upgrade file.
9. Click Install.
The install status window opens.
10. Select the check box to have the install messages automatically
scroll. These messages can be saved to a file.
(Optional) After the installation completes, click Save To File and
choose a name and location for the file.
11. Click Close when the installation on all the storage nodes is
completed.
Page 4