
HP StorageWorks P4000 G2 Series Upgrade to 10 GbE Hardware installation instructions (AX705 96001, February 2010)

http://www.hp.com/support/manuals
In the Storage section, navigate to Disk Storage Systems > LeftHand
P4000 SAN Solutions and then select your product.
Installing the 10GbE board and RAM
Have the following items ready:
• HP StorageWorks P4000 G2 Upgrade Kit, which includes:
• HP IB 4X DDR Conn-X PCI-e G2 Dual Port HCA
• 2GB PC3 DIMM
• T-10 wrench
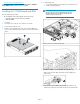
1. Loosen the screw on the top cover with the T-10 wrench.
2. Press the latch on the top cover.
3. Slide the cover toward the rear of the server and then lift the top
cover to remove it from the chassis. Lift the top cover away from the
chassis.
4. Locate the PCI cage.
1. Loosen the two thumb screws and the rear conventional screw
2. Lift the assembly straight up.
NOTE:
The PCI cage is the same for both the P4300 G2 and
the P4500 G2. However, the P4500 G2 PCI cage has
a DVD drive mounted to the top.
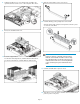
5. Remove the slot cover from the PCI cage.
6. Install the 10 GbE board into the open slot in the PCI cage.
Make sure the board is fully seated in the slot, then tighten the
anchor screw.
7. Align the PCI cage assembly to the system board expansion slot,
and then press it down to ensure full connection to the system board.
Page 2