
HP LeftHand SAN Solutions Support Document - Application Notes - Best Practices for Enabling Microsoft Windows with SAN/iQ®


Table Of Contents
- Application Notes Best Practices for Enabling Microsoft Windows with SANiQ
- Contents
- 1 Chapter: Enabling LeftHand SAN volumes with the Microsoft™ iSCSI 2.0x Initiator
- 2 Chapter: Finding the iSCSI Initiator Version
- 3 Chapter: LeftHand Networks and Microsoft™ MPIO Support
- 4 Chapter: Expanding a Windows Volume on the SAN
- 5 Chapter: Shrinking a Windows Volume on the SAN
- 6 Chapter: Setting the Windows Disk Partition Offset for Optimal Performance
- 7 Chapter: Ensure That Application Resources on iSCSI Volumes Come Online After a Server Reboot
- 8 Chapter: Microsoft™ iSCSI Initiator Session Timeout Setting
- 9 Chapter: Measuring Performance in a Windows Environment
- Overview
- Using Windows Performance Monitor to Measure SAN Performance
- Setting up Windows Performance Monitor
- Saving a Performance Monitor Log for Analysis
- Monitoring More Than One Server Simultaneously
- Scheduling Performance Data Collection
- Using IOMeter as a SAN Benchmark Tool
- Configuring the ISCSI Volume
- Configuring IOMeter
- Configuring IOMeter Access Specification for each Test
- Running the Test
- Interpreting Results
- Access Specifications to Run
- 10 Chapter: Frequently Asked Questions
62
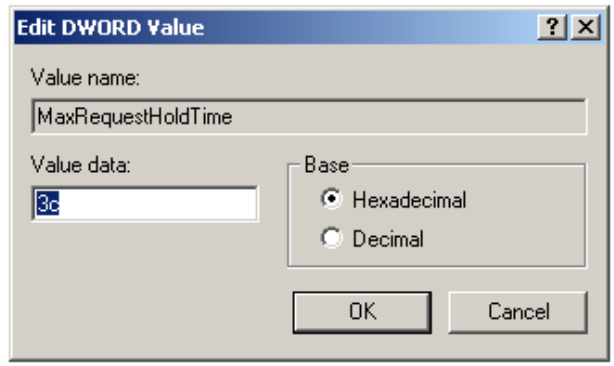
6 Double-click on the MaxRequestHoldTime registry value, highlighted
above, to bring up the following window:
7 Change the Base from Hexadecimal to Decimal
8 Enter 600 for the Value data and click on OK. This sets the
MaxRequestHoldTime to 600 seconds (i.e., 10 minutes).
9 Exit the registry editor.
Important: The new iSCSI timeout value will not take effect until
the next time the server is restarted.
Creating the Maxrequestholdtime Value
Note: This section only applies if the MaxRequestHoldTime value was
not found in CurrentControlSet in Step 5 of the procedure above.
1 To start the registry editor in Windows, click on Start and select Run from
the menu.
2 Type regedit in the available Open: field, and click on OK.
3 Navigate to the following registry key:
4 HKEY_LOCAL_MACHINE\SYSTEM\CurrentControlSet
Note: There may be additional control sets in the registry. Confirm
that you have selected the CurrentControlSet.