
.HP LeftHand P4000 Virtual SAN Appliance in an HP BladeSystem environment solution guide (AT459-96002, April 2009)
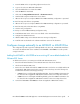


3. Select Create a new virtual disk and click Next.
4. In the Disk Capacity section, designate a capacity that is suitable for the amount of storage
available on your ESX Server. See Table 5 for information about maximum disk size.
5. In the Location section, select Store with Virtual Machine and click Next.
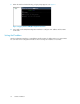
6. For the first disk select the Virtual Device Node to be SCSI 1:0 from the drop-down menu. For
additional disks, assign SCSI 1:1 through 1:4, in sequential order in the drop down menu.
NOTE:
The VSA supports up to five VDMKs for VSA storage.
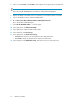
7. Select Mode, Independent >Persistent and click Next.
8. Review the device configuration and click Finish to complete the Add Hardware wizard.
The Virtual Machine Properties window opens.
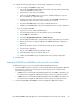
9. Click the Resources tab.
10. Select CPU and reserve at least 2000 MHz.
11. Select Memory and reserve 1024MB.
12. Click OK to close the Virtual Machine Properties window.
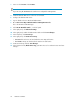
13. Select ESX Server in the Inventory panel.
14. Click the Resource Allocation tab.
15. Verify the CPU and memory reservations just set.
Power on the VSA and configure IP address and host name
Power on the VSA
To turn on the VSA:
1. In the inventory panel, select the new VSA and power it on using the Power On command on
the Information panel.
2. Click the Console Tab and wait for the VSA to boot.
HP LeftHand P4000 Virtual SAN Appliance in an HP BladeSystem environment solution guide 29