
8.5 HP StorageWorks P4000 VSA Installation and Configuration Guide (TA688-96017, September 2010)


• Add the VSA to inventory
• Select the network
• Configure the data disk(s)
• Reserve the CPU and memory
• Power on the VSA
• Set the IP address and host name of the VSA
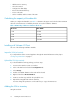
Calculating the capacity of the data disk
When you configure the data disk, use Table 1 to determine the proper size for the disk. The maximum
disk size on the ESX Server is limited by the block size used to format the datastore.
Table 1 Relationship of disk size to datastore block size
Max VMDKBlock Size
256 GB1 MB
512 GB2 MB
1024 GB4 MB
2048 GB8 MB
Installing with VMware VI Client
Use one of the following installation methods.
Import the VSA (ovf version)
If you imported the VSA as a virtual appliance through the Virtual Infrastructure Client, skip to
“Configuring a data disk” on page 11.
Upload the VSA (zip version)
If you downloaded the VSA zip package, use these steps.
1. Connect to the ESX host via VC or VI Client.
2. Click on the ESX host and select the Configuration tab.
3. Select Storage.
4. Find the local VMFS datastore where VSA will be hosted.
5. Right-click and select Browse DataStore.
6. Create a new directory and click the upload files icon.
7. Upload the unzipped folder with the VSA files.
You must change the permissions on the VSA files you copy to the ESX Server.
Adding the VSA to inventory
Using the VI Client:
Installing the VSA for ESX Server10