HP Video Over Ethernet User Guide
© 2012 Hewlett-Packard Development Company, L.P. The information contained herein is subject to change without notice. The only warranties for HP products and services are set forth in the express warranty statements accompanying such products and services. Nothing herein should be construed as constituting an additional warranty. HP shall not be liable for technical or editorial errors or omissions contained herein. This document contains proprietary information that is protected by copyright.
Table of contents 1 Product Overview ............................................................................................................. 1 Features .................................................................................................................................. 2 2 System Setup .................................................................................................................... 3 System Requirements ..................................................................
Using ViewSpan ............................................................................................................. 33 User Options ......................................................................................................................... 33 5 Troubleshooting .............................................................................................................. 37 Issues and Solutions ...........................................................................................
1 Product Overview HP Video Over Ethernet (VOE) is a system of software, hardware, and firmware for connecting HP Digital Signage Displays on a network with computers/media players on the same network. A computer or media player running VOE software becomes a candidate video source for displays anywhere on the network and is referred to in this manual as a media player, or just player. The connection between the display and player is called an association.
Features The Video Over Ethernet system offers: 2 ● Remote display discovery, association, and connection ● Change association and connection between displays and players ● Ability to associate and connect up to 12 displays with one player ● Automatic association and connection between displays and players if the player name in the display matches the computer name of any player on the network ● Automatic re-association and connection after a network interruption Chapter 1 Product Overview
2 System Setup System Requirements Any player running a Microsoft Windows XP, Vista, or Windows 7 Operating System can become a VOE media player. Requirements are: RAM 4GB Disk space 12MB Windows Experience Index 4.0 to drive displays with 1366 x 768 native resolution 4.3 to drive displays with 1920 x 1080 native resolution Operating system Windows® XP (32 bit) Windows Vista® (32 or 64 bit) Windows® 7 (32 or 64 bit) CPU Dual-core 2.
After the programs are installed, VOE starts automatically and will always run as a background process unless the user deliberately stops it. The installation process installs a VOE icon on the desktop.
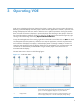
3 Operating VOE VOE runs as a background process whenever the player is running. This process monitors the network, detecting connected displays and other players. When the VOE application is started, it opens the user dialog and displays the VOE main menu to allow the user to perform operations. Closing the window does not break connections to displays or prevent the player from showing to other players.
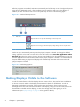
3 IP Address The IP address assigned to the display in the network 4 MAC ID The MAC ID of the display 5 Display Location Will show the Display Location field of the display if it has been created in the display's OSD menu or with the VOE Display Settings Dialog 6 Display Model Displays the model number of the networked display 7 Player Name Displays the Player Name of the player associated with the display 8 Status Displays the status of the display.
Entering Display Information Each VOE display has variable data populated either by the end user or by the VOE software. Data fields include: ● Player Name ● Display Name ● Display Location ● Display Model The Display Name, Display Location, and Player Name fields can include up to 32 characters or numbers along with any special character except the percent sign (%).
In Windows Vista, open the Control Panel, choose System and Security, and then select See the Name of this computer to view or change the name of the player. VOE displays the Computer Name as the Player Name. In Windows XP, open the Control Panel, choose System, and then select Computer Name to see or change the name of the player. The Computer Name that VOE displays is the text starting from the left of the Full Computer Name to the first period delimiter (Example: The full computer name is: TestSys899-HP.
User Mode VOE manages the association between networked displays and players. There are two modes for managing the associations: User Mode and Administrator Mode. Each mode has a unique main menu that allows different functions depending on the mode. This section addresses User Mode. There is no password authentication required in User Mode. The first time VOE is launched, it opens in User Mode. See Figure 3-4 User Mode Menu on page 9.
Associate User Mode allows users to associate up to 12 displays with any one player and break or Clear any existing associations of displays to the player. An association may be made either one at a time, or multiple displays may be associated at the same time. In User Mode, any available display (with Ready to Connect status) can be chosen to be associated with the player. Make an Association One at a Time A single association is made as follows: 1.
2. Click on the Associate button to make the association. The confirmation box appears. Figure 3-7 Association and Connection Confirmation 3. Click OK to make the connection. Click on Cancel to abort the association and connection attempt. If the association and connection attempt is successful, the user is returned to the menu. The list is updated with a check mark in the Association box. The Player Name is filled in with the local player name, and the Status is changed to Connected.
Association and Connection of Multiple Displays In User Mode, VOE allows the association and connection of multiple displays at once. In the figure below, the menu list shows two displays available to be associated and connected with the player. Figure 3-9 Menu List with Available Displays 1. Click on the first check box. The Player Name is filled in, and a check appears in the check box.
2. Click on the next display to associate with this player. Both display lines now show the Player Name and checks in the association boxes. Figure 3-11 Multiple Displays Selected for Association and Connection 3. Click on the Associate button. The association and connection confirmation box appears.
4. The confirmation box shows both selected displays are ready to be associated and connected to the same player. Choose OK to keep the association and make the connection. The menu list updates, and the two displays now have a Connected status. Figure 3-13 Multiple Displays Associated and Connected Clear an Association and Connection In User Mode, the user can also break or clear the association and connection for any display associated with the player. To Clear the association: 1.
2. The Clear Association dialog box appears. Click OK to break the association and connection for the selected display. If applicable, click on Cancel to abort the Clear Association process. Figure 3-15 Clear Association Dialog Box After a successful clear, the menu list updates and shows the display is now available (Ready to Connect). The Player Name field is blank, and the check box is also blank.
Administrator Mode Administrator Mode allows the user to manage associations and connections for all the displays and players on the network. In Administrator Mode, the user can make or break an association on the player the user interface is running on (as in User Mode), or make or break an association between any other display and any other player in the network. Administrator Mode also enables additional tasks to be performed.
● Password – Allows the user logged on with the Master Administrator Password to assign, clear, and change passwords ● Display Settings – Allows the administrator to change the Display Name and Display Location information for any display that is not connected to a player ● Update Firmware – Allows the administrator to update the VOE firmware on any display in the network that is not connected to a player ● Logout – Leave Administrator Mode and return to User Mode Search In Administrator Mode, the s
Make an Association Make an association and connection as follows: 1. Click on the check box of the available (Ready to Connect) display to be associated with this player. Figure 3-19 Select Display to Associate and Connect 2. The Change Association dialog box appears. Click on the pull-down menu.
3. The pull-down list shows all the players in the network. Select the name of the player to associate the display with this player. Click OK to make the association.
4. The confirmation dialog box appears. Click OK to confirm the association and make the connection. If applicable, click Cancel to abort the association and connection process. Figure 3-22 Association and Connection Confirmation The menu list updates according to choices made.
Change an Association Administrator Mode allows the user to change the association of any display with any player. The process is very similar to making an association with an available display (Ready to Connect) in User Mode, except the user may choose any Connected display on the list. To change an association and connection: 1. Select the display whose association and connection are to be changed by clicking on the association box. Figure 3-24 Select Display to Change Association and Connection 2.
3. The menu list updates and shows the display now Connected to the new player. Figure 3-26 Updated Menu List with New Player Connected Reset Display Reset Display reboots the VOE hardware in any highlighted display selected from the menu. The display must be available (Ready to Connect). In the unlikely event that a display should freeze or seem to hang up, press the Reset Display button to make VOE operational again. View Log Each player has an event log created by VOE.
To view the event log for a player, press the View Log button. VOE displays the log in a Windows Notepad window. The VOE log may be saved to a file, edited, formatted or viewed the same as any other text file in Windows Notepad. Figure 3-27 VOE Log File Password VOE provides a Master Password set to admin by the factory. It is recommended that the password be changed immediately to something unique. The password can be a maximum of 30 characters.
To manage passwords in VOE: 1. Log on with the Master Administrator password. Press the Password button on the Administrator Mode menu, and the Password Dialog box appears. Figure 3-29 Password Dialog Box 2. To change the Master Administrator password, click on the Change Password button. 3. The Change Password dialog box appears. Enter the new password in the Change Password field. Passwords are case sensitive and may be any combination of alphanumeric characters and blanks up to 30 characters.
4. To clear the error message, click on OK. Re-enter the correct password in the Confirm New Password field, and click Submit. The Change Password confirmation box appears. Figure 3-32 Change Password Confirmation Box 5. Click OK on the Change Password Confirmation box. Reset Password Option 1. If the user clicks the Reset Password button on the password dialog box, the Master Administrator password resets to admin. Figure 3-33 Reset Password Confirmation 2.
Additional Administrator Passwords VOE allows the assignment of three additional Administrator passwords. These additional Administrator passwords grant authority to users to execute all the functions of the Master Administrator password except for Password management. Only the user logged on with the Master Administrator password can access and execute the Password management functions. To set additional Administrator passwords: 1.
3. The Change Password confirmation box appears. Click OK to clear the Change Password confirmation box and return to the Password dialog. Figure 3-37 Change Password Dialog Box for Administrator Password Clearing the Additional Administrator Passwords The Master Administrator may clear any of the three additional Administrator passwords. To clear passwords: 1. Click on the Clear Password button next to the Administrator password to be cleared.
2. The Clear Password confirmation box appears. Click OK on the Clear Password confirmation box to return to the Password Dialog box. Figure 3-39 Clear Password Confirmation Box 3. The Password Dialog box appears. To exit, click OK to return to the Administrator Mode menu. Figure 3-40 Exit Password Dialog Display Settings Each VOE display has two user fields that may be populated to help identify displays and their locations.
To populate the Display Name and Display Location fields using VOE: 1. In the Administrator menu list, highlight the desired display by clicking on any of the menu columns (other than the check box). The display must not be connected to any player, but it must have a status of Ready for Connection in the status column. Click on the Display Setting button. Figure 3-41 Highlighting a Display to Enter Display Information 2.
3. Enter the Display Name and Display Location information in their respective fields in the Configuration Dialog box. Click Set to save the change to the display memory. When this button is clicked, there may be a slight delay until the confirmation message appears. If applicable, click Cancel to abort the change. Figure 3-43 Enter Display Name and Display Location 4. The confirmation message appears. Click OK to clear the confirmation message.
5. The menu list updates with the new Display Name and Display Location. Figure 3-45 Changed Display Name and Display Location Information 6. If the fields are not changed to the new information after clearing the confirmation message, click Search to refresh the display list in the menu. The new information should appear. Update Firmware HP digital signage displays (that support VOE) have firmware that communicates with the VOE software running on networked players.
3. Press the Update Firmware button on the Administrator Mode menu. Figure 3-46 Update Firmware 4. VOE opens the Windows dialog to browse for the directory of the firmware binary file that was downloaded by the user. Figure 3-47 Browse for Directory of Firmware Binary File 5. After locating the firmware file, highlight the file and click Open. The process of downloading to the display begins immediately. When this process finishes, a message pops up to indicate the status of the firmware update.
4 Using ViewSpan User Options ViewSpan provides users the ability to manage display settings for VOE displays. ViewSpan is installed with the VOE software and is launched by clicking on the ViewSpan icon in the System Tray. Figure 4-1 ViewSpan Icon When launched, ViewSpan presents the Windows Display Settings dialog screen. Figure 4-2 View Span Display Setting Dialog The Display Settings dialog screen offers the user choices.
The user may choose to: ● Detect and identify displays ● List the displays detected (See Figure 4-3 Display List on page 34.) ● Change the resolution of the displays (Refer to Figure 4-4 Change Display Resolution on page 35.) ● Change orientation of the displays (Landscape or Portrait mode) (See Figure 4-5 Change Display Orientation on page 35.) ● Define how multiple displays show the desktop (Go to Figure 4-6 Multiple Display Definition on page 36.
● Change resolution of the displays Figure 4-4 Change Display Resolution ● Change orientation of the displays (Landscape or Portrait mode) Figure 4-5 Change Display Orientation User Options 35
● Define how multiple displays show the desktop Figure 4-6 Multiple Display Definition ● Arranging displays in a single virtual desktop Figure 4-7 Arranging Displays in a Logical Desktop After the appropriate settings have been selected or the arrangement of displays is completed, click Apply to accept the changes, and then click OK to exit the dialog.
5 Troubleshooting Issues and Solutions At times VOE issues may occur, and solutions to address those issues are indicated in the Troubleshooting table. Table 5-1 Troubleshooting a VOE Network Problem Possible Solutions VOE Software does not detect a display Make sure the display is powered on and correctly connected to the network. Verify that the Display Name, Display Location, IP Address and other network settings in the display are correct.
Upgrading VOE All versions of VOE software and firmware are compatible with each other. Thus, players and displays on the same network can run different versions. Upgrading software is a simple matter of repeating the installation process described in Loading Software on page 3. Upgrading firmware is only slightly more complex. HP digital signage displays run two firmware programs: ● VOE assignments ● All other operations To view the procedure, refer to Update Firmware on page 31.