
HP SureStore HD Server 4000 User's Guide - 5967-9979


Backing Up and Restoring Files 9
-
11
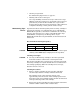
Tape Utilities
Use a browser at a network workstation to start HD Server Admin.
See page 4-1 to page 4-4. Click the
Backup/Restore
tab. Click the
Utilities
button under the tabs to access the
Tape Utilities
page.
(The
Backup
button is initially selected.)
Select Tape Drive
Under
Options
select the tape drive for operations on this Tape
Utilities page.
Drive 1
selects the tape drive with SCSI ID 3 (the
default drive selection, usually the internal drive), and
Drive 2
selects the tape drive with SCSI ID 5 (usually the external drive).
See chapter 8 for installing internal and external tape drives.
Erase Tape
Quick Erase
is used before recording new data at the front of the
installed tape, but does not fully destroy the existing data.
Full Erase
destroys all data, and may take two or more hours.
Create Tape
Catalog
You can use
Create Tape Catalog
to read the installed backup tape
to make a listing of its directories and files in a text file on the
volume. Specify a disk file, and click the
[Create]
button. The catalog
is used to verify file locations and to cut and paste paths for
restoring. It effectively quick erases the tape as well.
Test Tape
Test Tape
stores a small amount of data on the installed tape, reads
the data and compares it, and displays results in a pop-up window.
Unload/Eject
Tape
Using
Unload/Eject Tape
, the tape is rewound if necessary and
unloaded. Unloading prevents the next backup from recording over
this one. (Note that on HP DLT drives, the tape
will not be ejected
when unloaded, merely made inaccessible for further recording
until manually reloaded.)
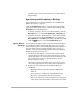
Backup/Restore Log
Use a browser at a network workstation to start HD Server Admin.
(See page 4-1 to page 4-4.) Click the
Backup/Restore
tab. Click the
Log
button under the tabs to access the
Backup/Restore Log
page. This page displays the contents of the log stored in the
c/system/logs/
directory on the volume. It accumulates a list of
backup and restore events.
To erase all events in the log file and restart accumulating events:
•
Use the
[Clear Log]
button on this page, or
•
Mark the
Reset Log
checkbox on
Options
pages (from
Backup,
Restore,
and
Schedule Entry
pages (see page 9-6 and
page 9-10)).