
HP SureStore HD Server 4000 User's Guide - 5967-9979


8
-
2 Adding a Tape Drive
Installing an Internal Tape Drive
You can install a tape drive listed in the “Internal tape drives” table
on page 8-1.
CAUTION!
To avoid damage:
❏
Verify that the server’s power cords are disconnected before you
do step 10 below.
❏
Protect the tape drive from static electricity. Before handling
the tape drive, touch any unpainted metal surface (such as the
grounded rear sheet-metal surface on the HD Server) to
discharge static electricity. Before installing the tape drive
module, touch an unpainted metal surface on the drive.
Steps
1. Unpack the tape drive product. Verify that you have the
following components. Other materials are not applicable to the
HD Server.
• Tape drive
• Tray for L Series
• Four Phillips screws (in bag)
•
Optional:
Power extension cable (see step 17)
• Data cartridge: DDS-3 for DAT24i, DDS-4 for DAT40i
• DDS cleaning cartridge
• Customer Care and warranty
•
Installation Guide.
Useful instructions include:
• Checking the drive’s SCSI ID
• Attaching the L-series mounting tray
• Attaching the SCSI cable and power cable extension
• Loading and unloading a cartridge
Other instructions are not applicable to the HD Server.
• Electronic
User’s Guide
on
HP SureStore Tape CD-ROM.
Useful instructions include:
• Items listed above for the printed
Installation Guide
• Cleaning with the DDS cleaning cartridge
Other instructions are not applicable to the HD Server.
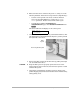
2. Assemble the following tools:
• Torx #15 driver for enclosure filler panel
• Flat-blade screwdriver for opening enclosure side door
• Phillips screwdriver for attaching drive mounting tray
• HD Server’s enclosure key for opening the keylock
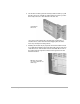
Note:
SCSI ID 3
3. On the rear of the tape drive, ensure that its SCSI ID is set to 3.
Refer to the electronic
User’s Guide
on the
HP SureStore Tape
CD-ROM
for instructions.