
HP SureStore HD Server 4000 User's Guide - 5967-9979


Resolving Problems with Your Server 11
-
29
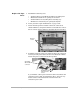
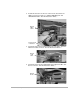
5. The adjacent connection is the SCSI ribbon cable connection
(see illustration above). Squeeze the levers at both ends of the
connector to release it from the connector on the tape drive.
(On a DAT24i drive, the connector will release from a 68-to-50-pin
adapter.) The tape drive is now fully detached.
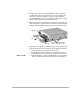
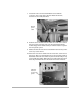
6. Push the tape drive module from the inside rear and, with your
other hand, receive it from the front of the enclosure. The module
consists of the tape drive mounted on a tray. Set the module down.
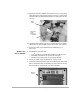
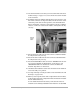
7. Unpack the new tape drive module and prepare it to be identical
to the removed one in the following ways (see illustration above):
• Drive installed in the L-series mounting tray.
• Power extender cable attached or not attached (see step 4).
• For DAT24i, move the 68-to-50-pin adapter to the new one.
Note: SCSI ID
• Same SCSI ID set. (A drive with SCSI ID 3 is recognized as
“Drive 1” for backup and restore functions. See chapter 9.)
Screws in upper mounting
holes secure drive in tray.
Tape drive
Tray
SCSI ID