
Migrating from HP-UX 11i v1 Virtual Partitions to a Mixed HP-UX Version Environment


7
• New software layout
• Disks are shown by default in the new I/O scheme
• Refer to the Installation and Update Guide
• Users of newer HP Integrity systems (upgrading from HP-UX 11i v2) must watch out for hyper-
threading on. Hyper-threading is set at the nPartition level and is defaulted to “on” for HP-UX
11i v3, but is not supported by HP-UX 11i v2. It can be checked and changed with the
nPartition commands:
parstatus -T
parmodify –p {nPar #} –T n
• The process will take 1-2 hours, including an automatic reboot and fileset configuration.
Once the Operating Environment and vPars software are installed, it will be necessary to either
recover or recreate the vPars database. It must be either copied (from backup, the network, or by
mounting a different virtual partition’s root disk), or recreated from scratch. After the vPars database is
in place, modify the autofile to “hpux /stand/vpmon” (the Ignite process will have overridden it). This
can be done at the boot loader prompt with the hpux set autofile command.
At this point, you can reboot to the vpmon and load all of the virtual partitions. As each of the HP-UX
11i v1 virtual partitions comes up, complete the installation of iCAP by logging in as root and issuing
the command, “swconfig B9073BA”.
When it becomes desirable to have an additional virtual partition on HP-UX 11i v3, this may be done
by shutting down the virtual partition and running the Ignite process by logging into the existing HP-
UX 11i v3 virtual partition and using the install option to vparboot: “vparboot -I”.
Update to HP-UX 11i v1 / 11i v2 Mixed Virtual Partitions Steps
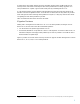
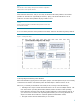
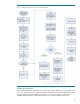
This consists of a set of parallel invocations of update-ux and swinstall. An overview of the process is
depicted in Figure 3. In general, the process is much the same as updating a set of nPartitions, with
the following exception:
Critical:
All of the virtual partitions must be put into manual boot mode prior to
starting the updates and installs.