
LVM/VxVM and vPars sx2000 Upgrade

22
2.3. Boot HP-UX in LVM maintenance mode:
HPUX> boot –lm /stand/vmunix
OS
POST-UPGRADE STEPS
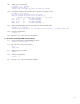
1. Check that the boot device special filenames as written down in preparation step 4.4.2 of the previous section
titled
Determining What Is Configured In Each Npartition
maps to the correct hardware path (remember that
the hardware paths will have changed according to Table 1):
# ioscan -fnk /dev/dsk/c2t10d0s2
Class I H/W Path Driver S/W State H/W Type Description
========================================================================
disk 3 4/0/4/1/0.10.0 sdisk CLAIMED DEVICE HP 73.4GMAT3073NC
/dev/dsk/c2t10d0 /dev/rdsk/c2t10d0
/dev/dsk/c2t10d0s1 /dev/rdsk/c2t10d0s1
/dev/dsk/c2t10d0s2 /dev/rdsk/c2t10d0s2
/dev/dsk/c2t10d0s3 /dev/rdsk/c2t10d0s3
# ioscan -fnk /dev/dsk/c9t8d0
Class I H/W Path Driver S/W State H/W Type Description
=======================================================================
disk 4 2/0/1/1/0.8.0 sdisk CLAIMED DEVICE HP 73.4GMAT3073NC
/dev/dsk/c9t8d0 /dev/rdsk/c9t8d0
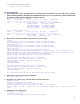
2. Get the device filenames which are part of the root volume group:
# vgscan
vgscan: Warning: couldn't query physical volume "/dev/dsk/c2t10d0s2":
The specified path does not correspond to physical volume attached to
this volume group
vgscan: Warning: couldn't query physical volume "/dev/dsk/c9t8d0":
The specified path does not correspond to physical volume attached to
this volume group
vgscan: Warning: couldn't query all of the physical volumes.
vgscan: The physical volume "/dev/dsk/c9t8d0" is already recorded in the "/etc/lvmtab" file.
vgscan: The physical volume "/dev/dsk/c2t10d0s2" is already recorded in the "/etc/lvmtab" file.
Physical Volume "/dev/dsk/c2t8d0" contains no LVM information
Physical Volume "/dev/dsk/c2t10d0s4" contains no LVM information
Following Physical Volumes belong to one Volume Group.
Unable to match these Physical Volumes to a Volume Group.
Use the vgimport command to complete the process.
/dev/dsk/c9t8d0
/dev/dsk/c2t10d0s2
Following Physical Volumes belong to one Volume Group.
Unable to match these Physical Volumes to a Volume Group.
Use the vgimport command to complete the process.
/dev/dsk/c9t10d0s2
The Volume Group /dev/vg00 was not matched with any Physical Volumes.
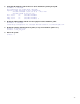
3. Remove the old root volume group information:
# vgexport /dev/vg00
4. Import the root volume group, using the files saved in Procedure C.1:
# mkdir /dev/vg00
# mknod /dev/vg00/group c 64 0x00000
# vgimport -m /mapfile.vg00 –f /pvs.vg00 /dev/vg00
Warning: A backup of this volume group may not exist on this machine.
Please remember to take a backup using the vgcfgbackup command after activating the volume
group.
5. Activate the root volume group:
# vgchange –a y /dev/vg00
Activated volume group
Volume group "/dev/vg00" has been successfully changed.