
LVM/VxVM and vPars sx2000 Upgrade


10
PROCEDURE A
This is for an nPartition that contains virtual partitions and the first vPar boots on an LVM configuration. Other vPars within the nPartition
may boot on an LVM or VxVM configuration.
P
RE-UPGRADE STEPS
1. For each virtual partition that has an LVM boot configuration, perform the following:
1.1. Save the LVM root volume group configuration. The map and Physical Volumes files must be created in the / directory, so that
they can be accessed while in LVM maintenance mode boot:
# vgexport -m /mapfile.vg00 –p -f /pvs.vg00 /dev/vg00
vgexport: Volume group "/dev/vg00" is still active.
1.2. Backup the original ioconfig files:
# cp /etc/ioconfig /etc/ioconfig.bckup
# cp /stand/ioconfig /stand/ioconfig.bckup
1.3. Update the ioconfig file using the executable found on the CD:
# <path>/sanddune_upgrade.ia64 -w /etc/ioconfig
# <path>/sanddune_upgrade.ia64 -w /stand/ioconfig
1.4. If this virtual partition is running X.25, update the X.25 configuration using the executable found on the CD:
# <path>/x25_pci2pcix_hwpath_upgrade.script -w /etc/sync_wan/config.db
1.5. Shutdown and halt this virtual partition:
# reboot –sh
1.6. Go back to 1.1. for the next virtual partition booting on LVM.
2. For each virtual partition that has a VxVM boot configuration, perform the following steps:
2.1. Backup the original ioconfig files:
# cp /etc/ioconfig /etc/ioconfig.bckup
# cp /stand/ioconfig /stand/ioconfig.bckup
2.2. Update the ioconfig file:
# <path>/sanddune_upgrade.ia64 -w /etc/ioconfig
# <path>/sanddune_upgrade.ia64 -w /stand/ioconfig
2.3. If this virtual partition is running X.25, update the X.25 configuration using the executable found on the CD:
# <path>/x25_pci2pcix_hwpath_upgrade.script -w /etc/sync_wan/config.db
2.4. Shutdown and halt this virtual partition:
# reboot –sh
2.5. Go back to 2.1 for the next virtual partition booting on VxVM.
3. On the console, at the vPars Monitor prompt, reboot the Monitor into nPars mode:
MON> reboot nPars
Resetting the system
4. Perform the pre-upgrade steps for next nPartition (Note: this could be a different procedure).
EFI
POST-UPGRADE STEPS
1. Search for boot device.
1.1. Using the EFI Boot Manager, enter the EFI Shell:
Choose: “EFI Shell [Built-in]:”
Shell>
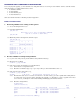
1.2. Find the file system mapping for the boot device path of the first virtual partition using the mapping found in preparation step
4.3 of the previous section titled Determining What Is Configured In Each Npartition. Look for the corresponding device map for
the boot device hardware path that looks similar to the following:
Shell> map
fs0 : Acpi(HWP0002,PNP0A03,404)/Pci(1|0)/Scsi(PunA,Lun0)/HD(Part1,Sig8786850E-A951-11DA-
8002-D6217B60E588)