
HP-UX Virtual Partitions Administrator Guide (includes A.05.09) (5900-2188, March 2012)
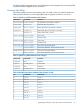
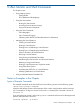

Table 24 HP 9000 Superdome Hardware Path Changes (
x=cell
) (continued)
sx2000 Pathsx1000 PathSlot
x/0/10/1x/0/10/19
x/0/9/1x/0/9/110
x/0/8/1x/0/8/111
Upgrading Backplanes from PCI to PCI-X
If you upgrade from the PCI to PCI-X backplane with the following server upgrades:
• rp7410 to rp7420
• the rp8400 to rp8420
• Superdome
the hardware paths of the I/O devices will change. The I/O device paths are in the format
• cell/sba/lba/device/function.target.lun
When changing from the PCI to PCI-X backplane, the device in the hardware paths will change
from 0 to 1. So, if a hardware path before the upgrade was
• 1/0/8/0/0.6.0
the new hardware path is
• 1/0/8/1/0.6.0
Not all I/O hardware paths change after the PCI to PCI-X backplane upgrade. For details on the
new paths for each slot, see the respective hardware upgrade manuals.
For vPars and other changes, including the correct LVM and VxVM modifications on a vPars system,
see the LVM and vPars I/O Hardware Upgrade Process document available on the BSC website
at www.hp.com/go/hpux-vpars-docs.
Be aware that instead of performing the upgrades for LVM, vPars, etc., you also have the option
of performing a cold-install on the upgraded rp8420 or rp7420 as if they were new systems with
no previous installations.
Updates Involving VPARSBASE
VPARSBASE (the free demo product for HP-UX 11i v1) is no longer available or supported.
You can update directly only from free product to newer free product or from purchased product
to newer purchased product. You cannot update directly from free product to the purchased product.
If you wish to update from the free product to the purchased product, first you need to remove the
free product VPARSBASE, and then install the purchased product T1335AC for HP-UX 11i v1.
To avoid having to recreate your vPars configuration, you can perform the following steps:
1. Backup the file /stand/vpdb (this file is the vPars partition database)
2. Remove the free product from all virtual partitions. See “Removing the vPars Product” (page 117).
3. Install the full product. See “Installing vPars with Ignite-UX on PA-RISC” (page 112) or “Installing
vPars with Software Distributor ” (page 116).
However, while in standalone mode, at the point where you would normally create the virtual
partitions using vparcreate, restore /stand/vpdb.
Then continue with the installation as you normally would.
Installing vPars with Ignite-UX on PA-RISC
1. Boot your system using the Ignite-UX server. If your Ignite server’s IP address is ww.xx.yy.zz:
112 Installing, Updating, or Removing vPars and Upgrading Servers with vPars