
HP-UX Virtual Partitions Administrator Guide (includes A.05.08) (5900-1312, March 2011)
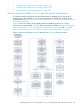
High-Level Description of the Mixed HP-UX 11i v1/v2 vPars Environment Update Process
The following list gives a high-level description of the process shown in Figure 10. After backing
up all virtual partitions and establishing a depot with the required HP-UX OE and vPars versions,
the steps are as follows. For details and examples see “The Update Process for Mixed HP-UX 11i
v1/v2 vPars Environments: Step by Step Details” (page 88).
1. Make sure that all the virtual partitions are up.
2. Record the current autoboot and autosearch settings of all the virtual partitions.
3. Change the autoboot setting to manual for all virtual partitions.
This step is critical, to avoid automatically rebooting into the wrong vPars Monitor.
4. Disable (undeploy) gWLM if it is in use.
5. Determine if it will be necessary to change the PRI boot path for the nPartition and record the
path details.
a. Find the nPartition partition number and the PRI boot path for the current nPartition.
b. Find the boot path of the boot disk of a future vPars A.04.05 virtual partition.
6. If it is necessary to change the PRI boot path for the nPartition, do so now using the parmodify
command from HP-UX running on any of the virtual partitions.
Because the vPars Monitor is loaded from the first virtual partition (whose disk is specified by
the PRI path), the PRI disk must be installed with vPars A.04.05.
7. Install the latest and OS-applicable Update-UX bundle onto each virtual partition that will be
updating the HP-UX Operating Environment—including all virtual partitions updating to HP-UX
11i v2 and vPars A.04.05.
8. For each virtual partition that is updating to HP-UX 11i v2 and vPars A.04.05, use Update-UX
to install the latest OE and vPars bundle.
The updated virtual partitions must not be rebooted at this point—keep the systems halted
while other virtual partitions are being updated. Rebooting to the new vPars Monitor occurs
later, after all virtual partitions have completed the software loading phase and have halted.
9. Install iCAP v8.03 on all HP-UX 11i v1 virtual partitions updating to vPars A.03.05.
iCAP v8.03 is required before installing vPars A.03.05.
10. Determine whether to update the remaining virtual partitions in parallel (concurrently with the
HP-UX 11i v2 and vPars A.04.05 updates) or stagger the remaining updates (wait for the
HP-UX 11i v2 and vPars A.04.05 updates to complete).
11. Update the remaining virtual partitions to vPars A.03.05.
The update steps will depend on whether you do a parallel update or a staggered update.
84 Installing, Updating, or Removing vPars and Upgrading Servers with vPars