
HP Integrity Virtual Machines 4.3: Installation, Configuration, Administration

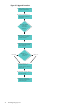

NOTE: If you plan to perform a cold install, follow these steps:
1. Offline migrate all virtual machines to another VM Host, for example, system X (which has
shared access to the storage).
2. Remove all virtual machines using the hpvmremove command.
3. Back up the /var/opt/hpvm directory.
4. Perform the cold install of HP-UX only, restarting the system. (Step 6 in the flowchart)
5. Restore the /var/opt/hpvm directory.
6. Install the Integrity VM. (Step 7 in the flowchart)
7. Offline migrate the virtual machines from system X.
8. Start the virtual machines. (Step 9 in the flowchart)
The first thing the administrator must do is to identify subsystems on the 11i v2 Integrity VM
server that are incompatible with or that are not supported on 11i v3. Some incompatibility issues
can be exposed by tools, and others are found in referenced documents. The most common
update problems are caused by the following:
• Unsupported hardware adapters or firmware
• Memory and system disk space requirements (HP-UX 11i v3 has increased both of these.)
• Obsolete or unsupported storage multipath solutions
• Layered products requiring an 11i v3 compatible version
2.3.1 Study the Current HP-UX 11i v2 to HP-UX 11i v3 Update Documentation
The first stage of upgrading an Integrity VM V3.0 or V3.5 server to an Integrity VM V4.3 server
is to review the following HP–UX 11i v3 operating system update documents:
• HP-UX 11i v2 to 11i v3 Mass Storage Stack Update Guide
• Read Before Installing or Upgrading
• HP-UX 11i v3 Installation and Update Guide
• HP-UX 11i Version 3 Release Notes
• Serviceguard Specific Documentation
The following websites provide a general reference covering the features and hardware supported
in HP-UX 11i v3. Read these documents and become familiar with the information before
beginning the upgrade procedure.
• QuickSpecs for HP-UX 11i v3 Update 2 features and operating environments
• Upgrading to HP-UX 11i v3
As you are reading, pay particular attention to the new mass storage model, called the agile
device reference model , for naming and identifying devices. The 11i v2 model is called the legacy
device reference model. The new agile device model uses worldwide device identifiers (WWIDs)
to identify devices. The WWID is a device attribute that is independent of the device’s location
in a SAN or in an adapter/controller access path. Therefore, the agile device names are persistent
with respect to changes in the access path and can utilize multiple paths through a single device
name.
The legacy devices require multiple device names to access the same device through multiple
paths. Many Integrity VM customers use multipath solutions such as Secure Path, which allow
them to use a single device name to access all paths. Some of these 11i v2 multipath solutions
will continue to work, while others you must remove. The general solution for this particular
problem is to replace the existing multipath device with the new agile device name, with its
inherent multipath support, once the upgrade has completed.
2.3 Upgrading the VM Host from Previous Versions of Integrity VM V3.X to Integrity VM V4.3 35