
iTP Secure WebServer System Administrators Guide (Version 7.5+)


Testing the Image Setup
The final step is to test your clickable image setup.
With your Web client, open the HTML document that has the inline image. You should be able to
click the image and link to other documents. If clicking has no effect, check to see if the hypertext
anchor and ISMAP tag are properly set up (see “Adding a Hypertext Anchor” (page 128)).
Be sure to check the hypertext links for all the regions in your image map file. If you encounter a
server error while testing, you probably have an error in the image map file. For description of
the problem, see the server's error log.
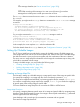
“Sample Image Map” (page 129) shows the contents of a sampleimage map file:
Table 12 Sample Image Map
#
# This is a sample image map file.
#
rectangle (50,50) (100,100) http://www.foo.com/
circle (200,50) 25 /secret-stuff.html
polygon (50,200) (50,250) (100,200) triangle.html
default /home.html
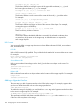
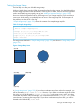
The image areas defined in “Sample Image Map” (page 129) are shown in “Image Map Areas”
(page 129).
Figure 4 Image Map Areas
(50, 50)
(50, 200)
(50, 250)
(200, 50)(100, 100)
(100, 200)
In “Image Map Areas” (page 129), if you select coordinates anywhere within the rectangle, you
will be directed to http://www.foo.com/. Likewise, if you select coordinates anywhere within
the circle, you will be directed to /secret-stuff.html on the same server; and if you select
coordinates anywhere within the triangle, you will be directed to the file triangle.html in the
same directory containing the image map. If you select coordinates anywhere else, you will be
directed to the default URL, /home.html.
Setting Up Clickable Images 129