
HP Integrity cx2600 Operations and Maintenance Guide


Removing the Management Processor Board
To remove the MP board, follow these steps:
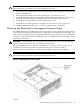
1. If rack-mounted, extend the server out from the rack until it stops. See “Installing Components
When the Server Is in a Rack” (page 114).
2. Power off the server. Disconnect all external cables.
3. Remove the server from the rack and place it on an ESD-protected work surface. See
“Removing the Server From a Rack” (page 115).
4. Remove the top cover. See “Removing and Replacing the Top Cover” (page 123).
5. Remove the processor airflow guide. See “Removing the Processor Airflow Guide” (page 128).
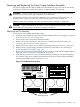
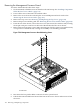
6. From the rear of the chassis, remove the two screws (hex 2-56 w/slot stainless steel) securing
the 25-pin serial port connector on the back of the MP board to the server chassis.
7. Remove the two noncaptive screws (M3 x 6mm long pan T15/slot square cone stainless steel)
on top surface of the MP board, securing the assembly to its mounting standoffs.
Figure 7-26 Management Processor Board Mounting Screws
chasmpbrdxtnd
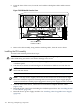
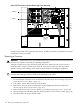
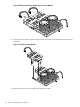
8. Disconnect the low-profile ribbon connector from the system board.
9. Pull the disconnected MP board toward the front of the server chassis and remove it from
the server.
146 Removing and Replacing Components