
Configuring HP Integrated Lights-Out 3 with Microsoft Active Directory HOWTO
2
Introduction
This paper tells you how to integrate HP Integrated Lights-Out 3 (iLO 3) processors with Microsoft®
Windows® Active Directory (AD) software to streamline configuration and avoid possible security
issues. It describes how to validate the directory after you finish the integration. The rest of this paper
refers to iLO 3 simply as iLO.
Integrating iLO with AD lets you have the same level of security as when you log into a Windows
environment. Using iLO with AD lets you set up group access to iLO processors. AD passes to iLO a
list of groups that contain the authenticated user. iLO compares the AD group list with the iLO
database. iLO uses a group match to build a list of authorized privileges for the authenticated user.
There are two LDAP methods for integrating iLO with AD: the HP Extended Schema method and the
Default Schema method. This paper describes the Default Schema method (also known as schema-free
integration). It is the most convenient way to integrate iLO with AD. It lets you configure the iLO
software for two levels of login flexibility:
• Minimum login flexibility requires a fully distinguished name, a password, and membership in a
group recognized by iLO.
• Better login flexibility requires a login name combined with user context.
iLO3 v1.20 and later versions also support the Kerberos method for integrating iLO with AD. That
method provides a single sign-on.
You can do automated schema-free integration using the Lights-Out Migration Utility, manual schema-
free integration using the iLO web interface, or automated Kerberos integration using the Kerberos
web interface.
Integration using the Lights-Out Migration Utility
Using the Lights-Out Migration Utility (v2.0 or greater) is the easiest way to set up iLO processors to
use AD. Use the following process to set up schema-free integration.
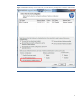
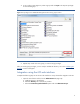
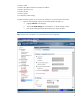
1. Open the HPQLOMIG.EXE utility. Click Next at the main screen. The utility will discover the
iLO processors and list them in the Select Directory Access Method screen.
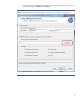
2. Select the Use the directory’s default schema option and click Next (Figure 1).