
HP Insight Remote Support 7.0.9 Installation and Configuration Guide


here is used as the default site information for your environment and is assigned to newly discovered
devices. Keep the site information current because this specifies the location where support services will
be delivered.
Additional sites can be configured on the Company Information → Sites screen.
Important: Make sure you type the correct address details, as the service is delivered to the
address details provided.
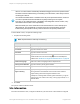
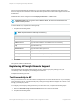
To add a default site, complete the following steps:
1. Complete the following fields:
Note: Required fields are marked by an asterisk (*).
Field Action
Site Name Type the site name.
Address Line 1 Type the site's address. Use Address Line 2 if necessary.
City Type the site's city.
State/Province Type the site's state or province.
Postal Code Type the site's postal code.
Country Select the site's country from the drop-down list.
Time Zone Select the time zone from the drop-down list.
2. Click Next.
The system creates the default site.
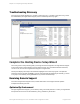
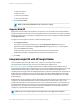
Registering HP Insight Remote Support
On the Registering HP Insight Remote Support screen, configure your proxy settings, text your
connectivity to HP, and register your Hosting Device with HP.
Complete the following sections:
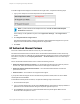
Test Connectivity to HP
Test your connection to HP to make sure the Hosting Device can communicate with HP. If your company
uses a web proxy server, configure the web proxy settings so Insight Remote Support can connect to HP
through your web proxy server.
To configure your web proxy settings and test your connection to HP, complete the following steps:
1. Select the Use Web Proxy to access Internet check box to activate the fields.
2. Complete the following fields:
HP Insight Remote Support 7.0.9:Installation and Configuration Guide Page 46 of 81
Chapter 3: Completing the Setup Wizards