
7.0.8 Insight Remote Support Monitored Devices Configuration Guide


Monitored Devices Configuration Guide
Chapter 36: Configuring Printers
2. Verify that the Disable SNMPv1/v2 option is selected.
3. Verify that the Enable SNMPv3 check box is selected.
4. Verify the User Name, Authentication Key and Privacy Key fields contain values. These fields
contain dots in order to maintain their security.
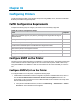
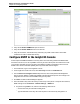
Configure SNMP in the Insight RS Console
Printers require the SNMP Read/Write community name. Since this setting enables both SNMP reads
and writes to the device, it is the only SNMP community access mode required. The Read access mode
is not required. The ability to write to the device with SNMP is needed for subscribing to device events.
SNMP is also used for model and capability discovery before data collection begins.
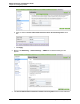
1. In a web browser, log on to the Insight RS Console.
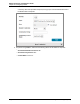
2. In the Insight RS Console main menu, select Discovery and click the Credentials tab.
3. From the Select and Configure Protocol drop-down list, select a Simple Network Management
Protocol version. SNMPv1, SNMPv2 and SNMPv3 are all supported for printers. The settings in the
Insight RS Console must match the SNMP settings on the printer.
4. Click New. The New Credential dialog box appears.
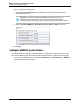
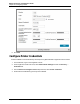
5. Fill out the fields so they match the values you have set up on the printer. In the printer user interface,
SNMP settings are on the Network → Network Settings → SNMP tab.
a. For printers using SNMPv1/v2, make sure the following values are set:
o
Set the Community Access Mode to READ_WRITE.
o
Type the GET/SET community name from the printer in the Community String field. If no
HP Insight Remote Support (7.0.8)Page 235 of 248