
7.0.8 Insight Remote Support Monitored Devices Configuration Guide


Monitored Devices Configuration Guide
Chapter 14: Configuring Tru64 UNIX Servers
At the SRM console firmware prompt (the prompt when you first power on the server), check the serial
number with the following command:
show sys_serial_num
The serial number shown should match the actual serial number on the model/serial number tag located in
the power cabinet. If necessary, change the serial number with the following command:
set sys_serial_num
Type the six-character serial number provided on the tag in the power cabinet.
Note: This issue also can arise when multiple AlphaServers are ordered, because the factory
may assign an identical serial number to each system. In this scenario, event rules do not work
correctly because they require that each AlphaServer have a unique number. If this is the case,
uniquely identify each AlphaServer by appending –1, –2, –3, and so on, to the serial numbers
when you use the set sys_serial_num command.
Multiple partitions on the same AlphaServer always have the same serial number because they
reside on the same machine. There are no conflicts in this case, so do not attempt to assign
unique serial numbers to different partitions on the same machine.
Installing the ELMC Tru64 UNIX Software Package
First, extract the ELMC Software Package, then install it.
To extract the ELMC installation kit, place the kit .gz file in a temporary directory and unzip it:
# gunzip ELMC_<version>.tar.gz
Then, extract the tar file. If there is already a "kit" subdirectory when you perform this command, be sure
there are no previous ELMC kit files in this subdirectory before performing the command.
# tar -xvf ELMC_<version>.tar
This command creates a kit directory (if it does not already exist), and extracts the ELMC installation files.
Note: If installing in a TruCluster environment, make sure all nodes are up and running before
proceeding.
When your current directory is the one in which you extracted the kit, type the following command to install
the files for the ELMC WCCProxy.
# setld -l kit
Do not run setld -D to direct the ELMC installation to a non-default directory. The default directory is
required for proper ELMC operation.
The kit will install and finish with no user prompting. When you are returned to the shell prompt (#), the
install has finished and the wccproxy process will be running.
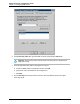
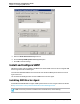
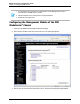
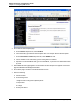
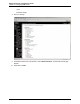
Create the ELMC Protocol in the Insight RS Console
To configure ELMC in the Insight RS Console, complete the following steps:
HP Insight Remote Support (7.0.8)Page 111 of 248