
A.05.80 HP Insight Remote Support Advanced Central Management Server Configuration Guide (October 2012)


Central Management Server Configuration Guide
Chapter 1: Insight Remote Support Advanced Prerequisites
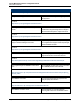
Internet Explorer: On 32-bit and x64 editions of Windows XP and Server 2003, Microsoft no longer
supplies a Java plug-in with the Internet Explorer Web browser. If you wish to use the 32-bit Internet
Explorer to connect to the WEBES SEA user interface (the 64-bit IE on x64 will not work with SEA), then
you must download and install a Sun JRE instead, which includes Web browser Java plug-ins.
Downloads are available from: http://java.sun.com/getjava.
Firefox: Does not include any Java VM. You must download and install a Sun JRE. Downloads are
available from: http://java.sun.com/getjava.
Internet Explorer Enhanced Security Features
On a CMS, the default lockdown settings include the Internet Explorer Enhanced Security Configuration
component. This component prevents the Remote Support Client from executing correctly and it must be
disabled, as follows:
Windows 2008
1. Select Start → Administrative Tools → Server Manager to open the Server Manager console.
2. Select the root Server Manager node in the left navigation tree.
3. In the right hand display, scroll down to the Security Information section and click on Configure IE
ESC.
4. In the Internet Explorer Enhanced Security Configuration dialog box, select Off for both
Administrators and Users to disable this feature and click OK.
5. Close the Server Manager window to exit.
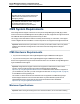
SNMP on the CMS
SNMP is a requirement for HP SIM, System Management Homepage, and Insight Remote Support
Advanced, and it must be installed on the CMS. SNMP is provided by Microsoft and if not already installed
on your CMS can be installed through your Microsoft Windows media.
Once you have SNMP installed on your CMS, configure it to receive events from your managed system:
1. On the CMS click Start → Administrative Tools → Services.
Note: If Administrative Tools does not display in the options, try Start → Control Panel →
Administrative Tools → Services.
2. Double click on SNMP service to open the Properties window.
3. On the Traps tab, make sure a community string is listed, and make sure localhost and
127.0.0.1 exists as a trap destination.
4. On the Security tab, choose either:
Accept SNMP packets from any host.
or
HP Insight Remote Support Advanced (A.05.80)Page 18 of 111