
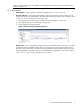
A.05.70 HP Insight Remote Support Advanced HP StorageWorks P4000 Storage System Migration Guide (October 2011, 5900-1528)


1.3.1.1.1 Selecting the Type of Upgrade
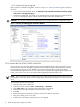
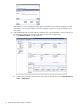
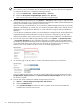
CMC supports two methods of upgrades, as shown in Figure 1-3 “Viewing the CMC Upgrade/Installation
Window”.
• One-at-a-time (recommended) - this is the default and only method that should be used if the storage
nodes exist in a management group.
• Simultaneous (advanced) - this allows you to upgrade multiple storage nodes at the same time if they
are not in a management group. Use this only for storage nodes in the Available pool.
CAUTION: Do not select “Simultaneous (advanced)” if your storage nodes are in a production cluster.
Figure 1-3 Viewing the CMC Upgrade/Installation Window
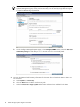
1.3.1.2 Increase the Size of the OS Disk on the VSAs
Due to changes in the size of the VMware tools that get installed during this software upgrade, you must
increase the size of the OS disk before upgrading the VSA. Additional space requirements are necessary
for future software releases, as well. Therefore, we recommend increasing the size of the OS disk to
accommodate both requirements at this time. These steps are required when upgrading from SAN/iQ 8.0
to 8.5 or 8.0 to 9.0 or 9.5, but is not required when upgrading from SAN/iQ 8.5 to 9.5.
NOTE: These instructions apply to VMware ESX Server. Other VMware products have similar instructions
for extending a virtual disk. Please consult the appropriate VMware documentation for the product you are
using.
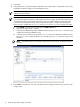
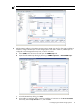
To increase the OS disk size on the VSA:
1. Using the CMC, power off the VSA.
2. Open the VI Client and select VSA → Edit Settings → Hardware.
3. Select Hard disk 1 (verify that the Virtual Device Node is SCSI (0:0)).
4. Under Disk provisioning, changed the provisioned size to 8 GB.
5. Click OK.
6. Repeat these steps for Hard disk 2 (verify the Virtual Device Node is SCSI (0:1))
7. Using the VI Client, power on the VSA.
8. Find the VSA in the CMC and apply the 8.5 or 9.0 upgrade.
12 P4000 Storage Systems Migration Procedure