
HP Insight Management Agents 9.1 Installation Guide


5. After HP Smart Update Manager appears, set the location of the updates, and then click Start
Inventory.
6. Select Local Host, and then click Next.
7. Select the server OS (Windows Server® 2003, Windows Server® 2008, x86, or x64), and
then click OK.
8. Click Install.
Configuring the SNMP Agents
To configure the SNMP Agents, click the HP Management Agents icon from the Windows® Control
Panel.
IMPORTANT: You must have administrator rights to access the Insight Management Agents for
Servers for Windows® Control Panel.
NOTE: The server might not have all of the tabs described.
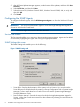
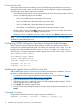
Services tab screen
The Services tab enables you to activate or deactivate Management Agents. Agents can be added
or removed by highlighting the agent and clicking the appropriate button.
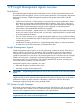
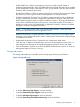
SNMP Settings tab screen
The SNMP Settings tab enables you to do the following:
Figure 1 SNMP Settings tab
• Server Role—Displays the description of the system’s role or function. You can also set the
Server Role text on multiple devices by creating a Group Configuration Task in Systems Insight
Manager. To learn more about how to set the server role see the Systems Insight Manager
Technical Reference Guide.
• Data Collection Interval—Controls the interval at which the Insight Management Agents for
Servers collect data. Set the time interval for data collection by selecting an interval from the
drop-down menu.
8 Installation and configuration instructions for Microsoft Windows