
HP Insight Management Agents 8.40 Installation Guide

Installation instructions for Microsoft Windows 8
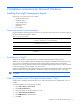
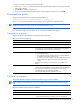
Asynch Mgmt tab screen
NOTE: Remote Access Service (RAS) must be installed to have access to the Asynch Mgmt tab screen.
The Asynch Mgmt tab enables you to do the following:
• Enable asynchronous management traps—Enables traps to be sent through RAS to a remote management
console over a modem. You must also enter the following data for asynchronous management trapping to
occur:
• Destination phone—Dials the number.
• User name and password—Logs on to the remote machine. You can select a specific logon domain to use,
or, if you do not select a specific domain, the domain for the remote machine is used. For more information
on remote user names and domains, see the Remote Access documentation from Microsoft
®
.
• Retry count—Redials if a busy signal is encountered.
NOTE: For information on setting up Insight Asynchronous Management on the management console for
Windows Agents, see the HP Insight Asynchronous Management User Guide.
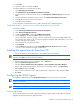
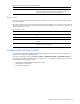
Process Monitor tab screen
The Process Monitor tab screen enables you to have SNMP traps generated when a process (a Windows
®
service)
starts, stops, or both. The list of processes that are currently running appears. The following Process Monitor options
are available:
• Select Monitoring Operations—Select a process from the list to set monitoring options for that process. The
following options are available:
• None—No SNMP traps are generated for this process.
• Start—An SNMP trap is generated when this process starts.
• Stop—An SNMP trap is generated when this process stops.
• Start & Stop—An SNMP trap is generated when this process starts or stops.
• Adding a New Process—Click Add to add a new process to the monitor. Enter the name of the new process,
and then click Apply to add the process.
• Deleting a Process—Highlight a process in the list, and then click Delete to delete the process.
NOTE: You can only delete processes that have been created by a user. The Delete button is disabled for
system default processes.
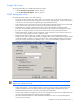
Configuring SNMP settings for OpenView Network Node Manager
When OpenView Network Node Manager (NNM) is installed, the SNMP settings must be configured in the SNMP
EMANATE agent. The settings are configured in the snmpd.conf file, located in the NNM installation directory
under \HP Openview\NNM\conf\SNMP Agent.
The following is a sample configuration. Other examples are provided in the snmpd.conf file.
get-community-name: public
set-community-name: PUBLIC
contact: Lab Administrator
location: Integration Test Lab
trap-dest: 170.20.1.10
trap-dest: 170.20.1.11
Installing the agents from a cp00xxxx.exe file
Before installing the agents, be sure the server meets the prerequisites for installation. For more information, see the
server user guide and release notes.
1. Download the smart component cp00xxxx.exe file that you want to install from
http://h18023.www1.hp.com/support/files/server/us/index.html
.