
HP Insight Control Server Provisioning 7.3 Update 1 Installation Guide
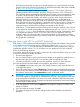
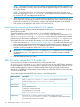
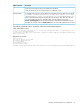
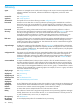
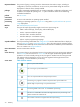
Table Of Contents
- HP Insight Control Server Provisioning 7.3 Update 1 Installation Guide
- Contents
- 1 Introduction/overview
- 2 Requirements and networking considerations
- 3 Installing your Insight Control server provisioning appliance for the first time
- Overview of the first time set up steps
- Get the software for a first time install
- Install Insight Control server provisioning on VMware vSphere/ESXi hypervisor
- Install Insight Control server provisioning on Microsoft Hyper-V hypervisor
- Log in to the appliance and configure appliance networking
- Accessing your appliance from a browser for the first time
- Next steps
- 4 Updating from version 7.2.2 to 7.3.1
- 5 DHCP server setup
- 6 Setting up the Media Server
- Introduction to the Media Server
- Introduction to the Insight Control server provisioning Media Server setup utility
- Requirements for setting up your Media Server
- Procedure for using the Insight Control server provisioning Media Server setup utility
- Changes made to your web server by Insight Control server provisioning Media Server setup utility
- 7 Generating and uploading WinPE to the appliance
- 8 Recommended actions after initial setup
- 9 Support and other resources
- 10 Documentation feedback
- A Updating from version 7.2 or 7.2.1 to 7.2.2
- Best practices for a successful update to 7.2.2
- Get the 7.2.2 update software and prepare it for use
- Prerequisites for update from 7.2/7.2.1 to 7.2.2
- Instructions for updating from 7.2 or 7.2.1 to 7.2.2
- What you need to do after installing the 7.2.2 update
- Changing from single NIC to multi-NIC (optional)
- Instructions for recovering from a failed 7.2.2 update
- REST API call to upload the 7.2.2 update file
- Glossary
- Index

NOTE: If you are starting from 7.2.0 release appliance, the appliance version will be
7.2.0–50506, before you install the patch. If you are starting from 7.2.1 release appliance,
the appliance version will be 7.2.1–60611, before you install the patch.
As the file is uploaded, you will see an uploading progress bar in the Update Appliance
dialog box. There is a Cancel button if you want to stop the file upload.
Once the progress bar reaches 100%, it will stay there for a while as the patch is unpacked
and verified.
You will know the file upload and verification is complete when the file name and version is
displayed in the Appliance Update dialog box, along with information on how long it will
take to install the uploaded file and whether a restart is required. DO NOT press any buttons
until you see this information displayed in the dialog box. You can click the Release Notes
link to read the release notes.
There is a Remove link that allows you to remove the uploaded file from the appliance. If you
upload a file and then close the browser without installing, the uploaded file persists. When
you return to the Update Appliance dialog box, you will be able to pick up where you left off
(post-upload and pre-install).
NOTE: If you cancel an upload or remove an uploaded file, you must clear your browser
cache and restart your browser before you attempt another upload.
5. Once the patch file upload is complete, click Install update to install the file you uploaded.
After clicking the Install update button, the End User License Agreement screen will be
displayed. After agreeing to the End User License Agreement, the Update appliance dialog
is re-displayed.
You must click the Install update button a second time to display a notification message with
an estimated time for the install update process.
You must click the Install update button a third time which displays an update progress screen
and starts the install.
The installation will take about 15 minutes. It does not require a reboot.
After the patch file install completes you will usually see the Settings screen displayed.
NOTE: After you install the patch file the appliance version will change depending on
whether you are updating form 7.2 or 7.2.1. If you installed the
IC-server-provisioning-7.2.0–patch.bin, the appliance version will change to
7.2.0–50508, a change in the build number from 50506 to 50508. If you installed the
IC-server-provisioning-7.2.1-patch.bin, the appliance version will change to
7.2.1–60612, a change in the build number from 60611 to 60612.
6. After the patch file install completes you must clear your browser cache and restart your
browser before uploading the next file. Select Actions→Update appliance in the Settings
screen. Click the Upload file button to browse to locate the ZIP file contents you unpacked.
7. Select the IC-server-provisioning-7.2.2–update.bin file to upload. As the file is
uploaded, you will see an uploading progress bar in the Update Appliance dialog box. There
is a Cancel button if you want to stop the file upload.
IMPORTANT: Once the progress bar reaches 100%, it will stay there for up to 10 minutes
or more while the update is unpacked and verified. DO NOT press any buttons until this
verification completes. You will know the file upload and verification is complete when the
file name and version is displayed in the Appliance Update dialog box, along with information
on how long it will take to install the uploaded file and whether a restart is required.
Once the file is uploaded and verified, you can click the Release Notes link to read the release
notes.
There is a Remove link that allows you to remove the uploaded file from the appliance. If you
upload a file and then close the browser without installing, the uploaded file persists. When
Instructions for updating from 7.2 or 7.2.1 to 7.2.2 63