
HP Insight Control Server Provisioning 7.3 Update 1 Installation Guide
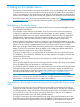
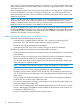
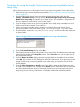
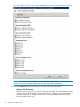
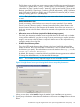
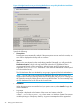

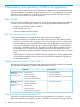
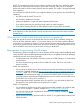
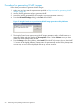
Table Of Contents
- HP Insight Control Server Provisioning 7.3 Update 1 Installation Guide
- Contents
- 1 Introduction/overview
- 2 Requirements and networking considerations
- 3 Installing your Insight Control server provisioning appliance for the first time
- Overview of the first time set up steps
- Get the software for a first time install
- Install Insight Control server provisioning on VMware vSphere/ESXi hypervisor
- Install Insight Control server provisioning on Microsoft Hyper-V hypervisor
- Log in to the appliance and configure appliance networking
- Accessing your appliance from a browser for the first time
- Next steps
- 4 Updating from version 7.2.2 to 7.3.1
- 5 DHCP server setup
- 6 Setting up the Media Server
- Introduction to the Media Server
- Introduction to the Insight Control server provisioning Media Server setup utility
- Requirements for setting up your Media Server
- Procedure for using the Insight Control server provisioning Media Server setup utility
- Changes made to your web server by Insight Control server provisioning Media Server setup utility
- 7 Generating and uploading WinPE to the appliance
- 8 Recommended actions after initial setup
- 9 Support and other resources
- 10 Documentation feedback
- A Updating from version 7.2 or 7.2.1 to 7.2.2
- Best practices for a successful update to 7.2.2
- Get the 7.2.2 update software and prepare it for use
- Prerequisites for update from 7.2/7.2.1 to 7.2.2
- Instructions for updating from 7.2 or 7.2.1 to 7.2.2
- What you need to do after installing the 7.2.2 update
- Changing from single NIC to multi-NIC (optional)
- Instructions for recovering from a failed 7.2.2 update
- REST API call to upload the 7.2.2 update file
- Glossary
- Index

The file share name and the user name cannot contain the following reserved characters:
< (less than) > (greater than) : (colon) " (double quote) / (forward slash) \ (backslash) |
(vertical bar or pipe) ? (question mark) * (asterisk) [ (open square bracket) ] (close square
bracket) ; (semicolon) = (equal sign) , (comma) + (plus) & (ampersand) ~ (tilde) ? (Question
mark) (null) and No leading or trailing space. The password cannot be (null) or contain
leading or trailing space or " (double quote).
NOTE: The \ (backslash) is allowed only in user name when domain\username format
is used.
Authorized Windows User
Specify an existing, valid Windows user name in the space provided. If your Media
Server is part of a domain, specify in domain\username format, where domain is the
domain name of the user or the hostname of the Media Server if the user account is a
local user. Access to the file share will then be restricted to that particular user name and
password.
• Allow write access to file share (required for Windows Image capture)
This check box determines whether access to the file share will be read only or whether
writing will be enabled. If you plan on using IC server provisioning to capture Windows
images, write access to the file share is required. Write access is also required for any
updates to Media Server log files.
• IIS HTTP Virtual Directory Name
This is the HTTP virtual directory that will point to the lower level folder where all the
media are stored. This lower level folder is named Media and is created under the top
level directory you specify. The web address to access the media is then http://<media
server ip>/<virtual directory>.
By default, this directory is created as read only with folder browsing permission enabled.
To change the default behavior, use the Microsoft IIS Manager.
NOTE: For increased security, captured images are not accessible via HTTP.
Figure 13 Insight Control server provisioning Media Server setup utility Parameters
When you are done, select Install to begin the Media Server installation set up process.
11. Specify set up information. Note that each distribution will have its own Setup screen as shown
below.
Procedure for using the Insight Control server provisioning Media Server setup utility 45