
HP Insight Control Server Provisioning 7.3 Update 1 Installation Guide

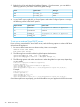
Table Of Contents
- HP Insight Control Server Provisioning 7.3 Update 1 Installation Guide
- Contents
- 1 Introduction/overview
- 2 Requirements and networking considerations
- 3 Installing your Insight Control server provisioning appliance for the first time
- Overview of the first time set up steps
- Get the software for a first time install
- Install Insight Control server provisioning on VMware vSphere/ESXi hypervisor
- Install Insight Control server provisioning on Microsoft Hyper-V hypervisor
- Log in to the appliance and configure appliance networking
- Accessing your appliance from a browser for the first time
- Next steps
- 4 Updating from version 7.2.2 to 7.3.1
- 5 DHCP server setup
- 6 Setting up the Media Server
- Introduction to the Media Server
- Introduction to the Insight Control server provisioning Media Server setup utility
- Requirements for setting up your Media Server
- Procedure for using the Insight Control server provisioning Media Server setup utility
- Changes made to your web server by Insight Control server provisioning Media Server setup utility
- 7 Generating and uploading WinPE to the appliance
- 8 Recommended actions after initial setup
- 9 Support and other resources
- 10 Documentation feedback
- A Updating from version 7.2 or 7.2.1 to 7.2.2
- Best practices for a successful update to 7.2.2
- Get the 7.2.2 update software and prepare it for use
- Prerequisites for update from 7.2/7.2.1 to 7.2.2
- Instructions for updating from 7.2 or 7.2.1 to 7.2.2
- What you need to do after installing the 7.2.2 update
- Changing from single NIC to multi-NIC (optional)
- Instructions for recovering from a failed 7.2.2 update
- REST API call to upload the 7.2.2 update file
- Glossary
- Index

3. Right-click on IPv4 and select Set Predefined Options... From that screen, you can add the
following options to your DHCP server IPv4 global settings:
Data typeOption nameCode
IP Addressbuildmgr_ip186
Wordbuildmgr_port187
4. In your DHCP scope, right-click on Scope Options and select Configure Options.. to assign
the following values to the DHCP options:
Option valueOption nameOption number
<Deployment IP address of appliance>Boot server66
pxelinux.0Boot filename67
<Deployment IP address of appliance>buildmgr_ip186
0x1F51buildmgr_port187
To set up an external Linux DHCP server:
If you are using a standard ISC Linux DHCP server, set the following options in order to PXE boot
servers from the appliance.
1. Be sure to set the lease time to at least one day. Here is an example:
default-lease-time 86400;
max-lease-time 129600;
2. The following lines must be included in global options declarations:
option buildmgr_ip code 186 = ip-address;
option buildmgr_port code 187 = unsigned integer 16;
3. The following options and values must be set in either the global or scope area, depending
on your needs:
next-server <Deployment-IP-Address-of-appliance>;
filename "pxelinux.0";
option buildmgr_ip <Deployment-IP-Address-of-appliance>;
option buildmgr_port 8017;
option dhcp-parameter-request-list = concat(dhcp-parameter-request-list,ba,bb,fc);
Example:
next-server 172.1.3.10;
filename "pxelinux.0";
option buildmgr_ip 172.1.3.10;
option buildmgr_port 8017;
option dhcp-parameter-request-list = concat(dhcp-parameter-request-list,ba,bb,fc);
Once these options are set properly, you should be able to use your appliance to PXE boot servers.
40 DHCP server setup