
HP Insight Control Server Provisioning 7.3 Update 1 Installation Guide

Table Of Contents
- HP Insight Control Server Provisioning 7.3 Update 1 Installation Guide
- Contents
- 1 Introduction/overview
- 2 Requirements and networking considerations
- 3 Installing your Insight Control server provisioning appliance for the first time
- Overview of the first time set up steps
- Get the software for a first time install
- Install Insight Control server provisioning on VMware vSphere/ESXi hypervisor
- Install Insight Control server provisioning on Microsoft Hyper-V hypervisor
- Log in to the appliance and configure appliance networking
- Accessing your appliance from a browser for the first time
- Next steps
- 4 Updating from version 7.2.2 to 7.3.1
- 5 DHCP server setup
- 6 Setting up the Media Server
- Introduction to the Media Server
- Introduction to the Insight Control server provisioning Media Server setup utility
- Requirements for setting up your Media Server
- Procedure for using the Insight Control server provisioning Media Server setup utility
- Changes made to your web server by Insight Control server provisioning Media Server setup utility
- 7 Generating and uploading WinPE to the appliance
- 8 Recommended actions after initial setup
- 9 Support and other resources
- 10 Documentation feedback
- A Updating from version 7.2 or 7.2.1 to 7.2.2
- Best practices for a successful update to 7.2.2
- Get the 7.2.2 update software and prepare it for use
- Prerequisites for update from 7.2/7.2.1 to 7.2.2
- Instructions for updating from 7.2 or 7.2.1 to 7.2.2
- What you need to do after installing the 7.2.2 update
- Changing from single NIC to multi-NIC (optional)
- Instructions for recovering from a failed 7.2.2 update
- REST API call to upload the 7.2.2 update file
- Glossary
- Index
the file via REST calls, you can then use any supported browser to install the update from
the UI.
◦ For the second file you upload, IC-server-provisioning-7.3.1-update.bin,
if you want to do the upload via the UI you must use Firefox or Chrome. If you do not
have access to these browsers or you prefer to do the file upload from a command line,
you can use the documented REST calls to upload the file from a Windows or Linux
command line. See “REST API call to upload the update file” (page 34). If you upload
the file via REST calls, you can then use any supported browser to install the update from
the UI.
CAUTION: Disk space requirement: An update uses a lot of disk space on your appliance. If
your current appliance was installed using thin provisioning (which is not recommended), the
update will cause the virtual disk to grow substantially. It is very important you make sure there is
at least 180GB of free space available on your host disk to allow for virtual disk expansion. If your
host disk runs out of space during an update, you will most likely need to create a new appliance
and restore from backup. Note that even if your appliance was installed with thick provisioning,
if you take a VM snapshot prior to starting the update process as recommended, you will need as
much as 50GB of storage for the snapshot.
Instructions for updating from 7.2.2 to 7.3.1
1. Before beginning the 7.3.1 update, shut down your appliance and take a VM snapshot or
clone of your appliance. (Note that online snapshots are not supported, the appliance must
be shut down before taking the snapshot.) Then, boot the appliance back up before applying
the update. This allows you to have a quick way to restore your appliance if an error occurs
during the update process, and has the added benefit of quiescing your appliance for the
update.
2. Before you begin the update verify your appliance version. The appliance version should be
7.2.2–72079. Go to the Settings→Appliance screen to verify the version.
3. Next you will be uploading the IC-server-provisioning-7.2.2-patch.bin file. You
can upload this file via the UI (Internet Explorer 9 version is required) or you can upload the
file using REST calls (see “REST API call to upload the update file” (page 34) for details). If
using the REST API, skip to step 6 once the file is uploaded.
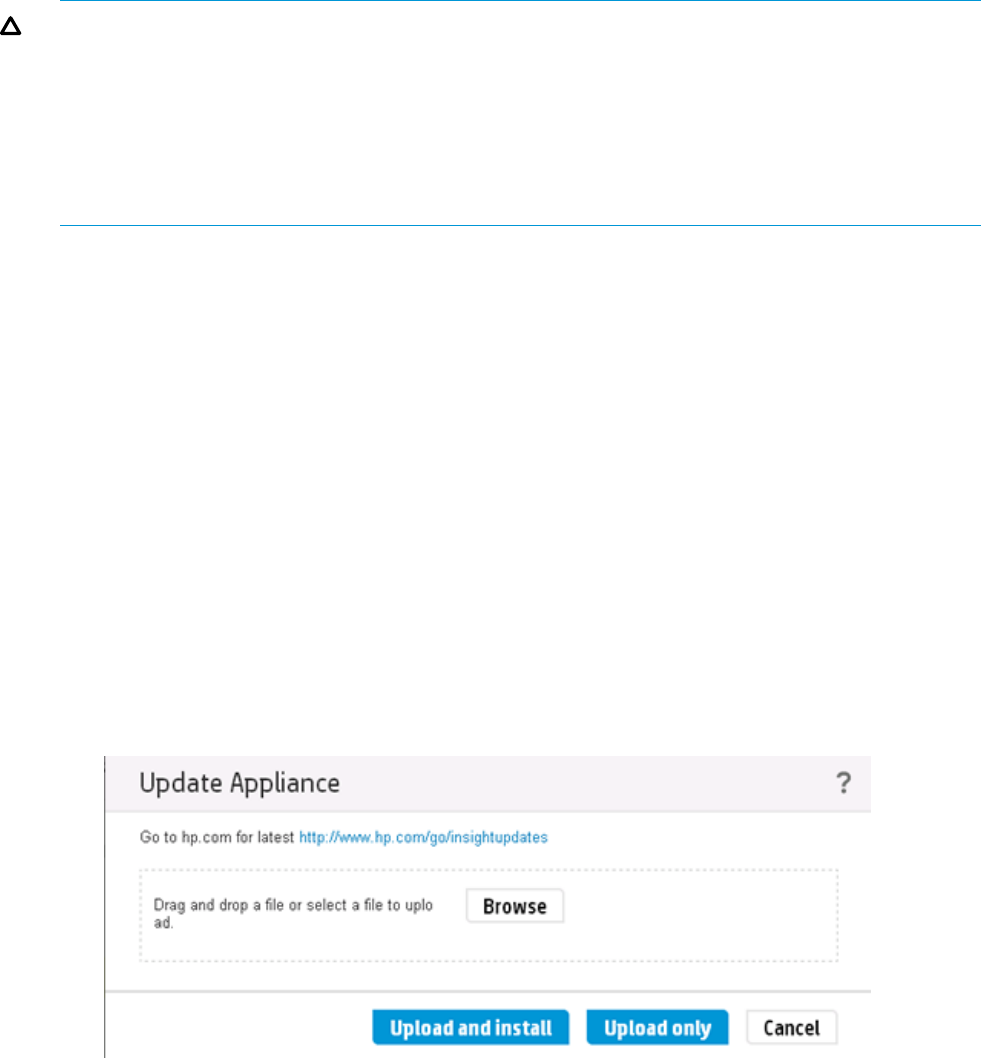
To use the UI to upload the file, open the UI in the appropriate browser and select
Actions→Update appliance in the Settings screen.
4. In the Update Appliance dialog box, click the Browse button to browse to locate the ZIP file
contents you unpacked locally.
5. In the Browse dialog select the IC-server-provisioning-7.2.2-patch.bin file to
upload first (or you can drag and drop the file). Then click the Upload only button.
Instructions for updating from 7.2.2 to 7.3.1 31