
HP Insight Control Server Provisioning 7.3 Update 1 Installation Guide
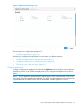

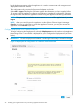
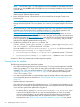
Table Of Contents
- HP Insight Control Server Provisioning 7.3 Update 1 Installation Guide
- Contents
- 1 Introduction/overview
- 2 Requirements and networking considerations
- 3 Installing your Insight Control server provisioning appliance for the first time
- Overview of the first time set up steps
- Get the software for a first time install
- Install Insight Control server provisioning on VMware vSphere/ESXi hypervisor
- Install Insight Control server provisioning on Microsoft Hyper-V hypervisor
- Log in to the appliance and configure appliance networking
- Accessing your appliance from a browser for the first time
- Next steps
- 4 Updating from version 7.2.2 to 7.3.1
- 5 DHCP server setup
- 6 Setting up the Media Server
- Introduction to the Media Server
- Introduction to the Insight Control server provisioning Media Server setup utility
- Requirements for setting up your Media Server
- Procedure for using the Insight Control server provisioning Media Server setup utility
- Changes made to your web server by Insight Control server provisioning Media Server setup utility
- 7 Generating and uploading WinPE to the appliance
- 8 Recommended actions after initial setup
- 9 Support and other resources
- 10 Documentation feedback
- A Updating from version 7.2 or 7.2.1 to 7.2.2
- Best practices for a successful update to 7.2.2
- Get the 7.2.2 update software and prepare it for use
- Prerequisites for update from 7.2/7.2.1 to 7.2.2
- Instructions for updating from 7.2 or 7.2.1 to 7.2.2
- What you need to do after installing the 7.2.2 update
- Changing from single NIC to multi-NIC (optional)
- Instructions for recovering from a failed 7.2.2 update
- REST API call to upload the 7.2.2 update file
- Glossary
- Index
Routing (CIDR) mask representing the number of bits reserved for network identification. Valid
CIDR values are 1 to 30, inclusive.
• Gateway address: This field is not required, but HP strongly suggests configuring it to ensure
access to the appliance. Specify the IP address for the network interface on your router.
• Preferred DNS server: IP address of your preferred DNS server. Not required.
• Alternate DNS server: IP address of your alternate DNS server. Not required.
Continue with one of the following to configure the Deployment IP:
• “Configure Deployment IP on the same network” (page 25)
• “Configure Deployment IP on a different network” (page 26)
Configure Deployment IP on the same network
To begin configuring the Deployment IP, select the 2 Deployment network interface in the Appliance
Networking screen. A set of fields is displayed for you to configure the Deployment IP (as shown
below).
Figure 9 Deployment IP configuration on same network edit fields
To configure the Deployment IP to use the same network adapter as the Appliance IP, select Shared
with management interface and enter the IP address for the Deployment network interface. Since
you selected Shared with management interface (which means shared with the appliance NIC)
above, the IP address must be on the same network as the Appliance IP. This is the IP address used
Log in to the appliance and configure appliance networking 25