HP Insight Control Server Provisioning 7.
© Copyright 2012–2014 Hewlett-Packard Development Company, L.P. Confidential computer software. Valid license from HP required for possession, use or copying. Consistent with FAR 12.211 and 12.212, Commercial Computer Software, Computer Software Documentation, and Technical Data for Commercial Items are licensed to the U.S. Government under vendor's standard commercial license. The information contained herein is subject to change without notice.
Contents 1 Introduction/overview.................................................................................5 2 Requirements and networking considerations.................................................7 Appliance VM and host requirements..........................................................................................7 Requirements for using the USB media or ZIP file software downloads.............................................8 DHCP considerations...........................................
Requirements for generating WinPE images...............................................................................49 Procedure for generating WinPE images....................................................................................50 8 Recommended actions after initial setup......................................................53 9 Support and other resources......................................................................55 Contacting HP ...................................................
1 Introduction/overview What is Insight Control server provisioning? Insight Control server provisioning is a virtual appliance used to install and configure HP ProLiant servers. Insight Control server provisioning uses resources such as OS Build Plans and scripts to run IC server provisioning deployment jobs.
Table 1 Insight Control server provisioning available information. (continued) Topic Where to find the information Troubleshooting plus known The Troubleshooting index in the online help is a repository for all issues and restrictions problem/recommendation information provided by IC server provisioning developers. See the Insight Control server provisioning section of the HP Insight Control Release Notes available at http://www.hp.com/go/insightcontrol/docs.
2 Requirements and networking considerations Insight Control server provisioning is delivered pre-installed on a virtual machine (VM) that is optimized to run the application. Before you install Insight Control server provisioning you need to check the host system requirements, check the requirements for using the USB media or ZIP file software download and consider which network configuration you will use. NOTE: Please check the website http://www.hp.
• 200 GB of disk space allocated for the VM plus another 16 GB of disk space to serve as storage for the 16 GB of memory required. IMPORTANT: HP strongly recommends using thick provisioning. If you use thin provisioning and your VM host disk runs out of space, the appliance will most likely encounter errors and terminate unexpectedly and may not recover. If this happens you will need to install a new appliance and restore from backup.
appliance optimized to run the IC server provisioning application, there is not enough storage on the appliance to host deployment software. For this reason, a separate Media Server is required in order to provision servers. See “Setting up the Media Server” (page 41) for details on the use of the Media Server, requirements for the Media Server and for details on using the Media Server setup utility.
Port Description Direction Communicating with 639 (tcp)* Enterprise directory outbound corporate enterprise directory server 3001 (tcp) SA agent communications both target server 8017 (tcp, udp) Agent gateway inbound target server 8081 (tcp) Agent cache inbound target server 111 (tcp, udp) RPC – for boot file NFS inbound target server 2049 (tcp, udp) NFS – for boot files only both target server 892 (tcp, udp) mountd both target server 123 (udp) ntp both target server 445 (
When configuring your appliance, you have the option to have the Appliance IP and the Deployment IP addresses sharing one network interface (Single NIC), or to use a separate network interface for each IP address (Multi-NIC). When configuring the appliance for Single NIC mode, use only the first NIC of your VM and leave the second NIC disconnected. Since the Appliance IP and Deployment IP addresses will share the first NIC, the IPs must be in the same subnet.
Figure 2 Multi-NIC Mode Example IC server provisioning Appliance Internet NIC 1 Appliance IP NIC 2 Deployment IP Management web browser Management Network Deployment Network iLO can be connected to either network iLO Target Server NIC Deployment NIC Media Server NIC Production NIC Production Network In Mulit-NIC mode, the deployment network is typically a separate and often isolated network where the deployment operations take place, while the management network is the one where users connect
Figure 3 Multi-NIC Mode with Matrix OE Example IC server provisioning Appliance NIC 1 Appliance IP MOE CMS Internet NIC 2 Deployment IP NIC Appliance IP NIC Deployment IP Management web browser Management Network Deployment Network iLO can be connected to either network iLO Target Server NIC Deployment NIC Media Server NIC Production NIC Production Network In the Multi-NIC mode with the Matrix Operating Environment configured; note that the Matrix Operating Environment CMS requires a NIC on b
3 Installing your Insight Control server provisioning appliance for the first time This chapter provides first time set up steps for getting the HP Insight Control server provisioning software and installing the virtual machine appliance. IMPORTANT: If you already have Insight Control server provisioning installed and are installing an update release (such as 7.3.1), skip this chapter and see “Updating from version 7.2.2 to 7.3.1” (page 28) for the appropriate installation instructions.
1. Download the software or insert the USB media. If you are downloading the software: Go to http://www.hp.com/go/insightupdates and select Download the latest Insight Management software link near the top of the page. Then locate the Insight Control server provisioning software and download the appropriate ZIP file to your host computer. Select the ZIP file for either the VMware full appliance or the Hyper-V full appliance depending on which hypervisor you intend to deploy to.
3. Proceed through the vSphere steps to deploy the VM. CAUTION: HP strongly recommends importing your appliance using thick provisioning. If you use thin provisioning and your VM host disk runs out of space, the appliance will most likely encounter errors and terminate unexpectedly and may not recover. If this happens you will need to install a new appliance and restore from backup. Do not select Power on this virtual machine after creation. Select Finish to initiate deployment of the VM. 4.
5. Next you power on the Insight Control server provisioning virtual machine for the first time as described below. IMPORTANT: Before powering on your virtual appliance, verify the date and time are set properly on your VM host system. You should be sure to maintain an accurate time on the VM host system, such as with NTP, because the VM guest will synchronize with that time. If your VM host does not have the time set properly, the following message will be displayed when you boot the appliance.
3. In the Import Virtual Machine wizard, browse to where you unpacked the Hyper-V image zip file and click through until you see the directories called Snapshots, Virtual Hard Disks and Virtual Machines. Select the parent directory of those three directories. 4. Continue through the steps in the wizard to import the appliance virtual machine.
IMPORTANT: (see below). 5. Be sure to select "Copy the virtual machine” (create a new unique ID) option Verify that the Insight Control server provisioning VM is configured to meet the host requirements (see “Appliance VM and host requirements” (page 7)), set up thick provisioning and set up network adapters on your VM host. If you need to edit settings on the VM, right-click on the appliance VM and select Settings.
IMPORTANT: Before powering on your virtual appliance, verify the date and time are set properly on your VM host system. You should be sure to maintain an accurate time on the VM host system, such as with NTP, because the VM guest will synchronize with that time. If your VM host does not have the time set properly, the following message will be displayed when you boot the appliance. The time and date on your hypervisor appears to be incorrect.
Figure 5 Login screen TIP: On ESXi/vSphere hypervisor console release your cursor from the Console with Ctrl-Alt. Restart first time set up in the Console with Ctrl-Alt-Backspace.
Figure 6 Set a new password IMPORTANT: Make sure you remember the new administrator password. Note that there is a password reset service if needed. Configure appliance networking HP Insight Control server provisioning requires you to configure an Appliance IP and a Deployment IP and corresponding netmask. See “Appliance networking considerations” (page 10) for additional information.
Figure 7 Appliance Networking screen The next step is to configure the Appliance IP: • “Configure Appliance IP” (page 23) And then you configure the Deployment IP on the same or a different network: • “Configure Deployment IP on the same network” (page 25) • “Configure Deployment IP on a different network” (page 26) • “Check for errors in first time setup” (page 27) Configure Appliance IP To begin configuring the Appliance IP, select the 1 Appliance network interface in the Appliance Networking scr
Figure 8 Appliance IP configuration edit fields Enter the networking information for the Appliance as follows: • Host name: This is the host name of the appliance. From a supported browser, you can navigate to the appliance by using this name or by using the appliance IP address. If you are supplying a DNS server, this host name must be fully qualified. 24 • IP address: This is the IP address you are assigning to this appliance (the Appliance IP).
Routing (CIDR) mask representing the number of bits reserved for network identification. Valid CIDR values are 1 to 30, inclusive. • Gateway address: This field is not required, but HP strongly suggests configuring it to ensure access to the appliance. Specify the IP address for the network interface on your router. • Preferred DNS server: IP address of your preferred DNS server. Not required. • Alternate DNS server: IP address of your alternate DNS server. Not required.
by the deployment engine within the appliance. It is used to communicate with a target server’s deployment interface IP address. This configuration only requires the first network adapter on the VM. Select OK or Logout. Selecting the OK button applies the information you have supplied. Allow 15 minutes while the appliance configures and reboots to complete the configuration. Selecting the Logout button exits from the appliance without saving the appliance networking information.
To configure the Deployment IP on a different network interface than the Appliance IP, select Independent on and enter the information for Deployment IP as described below. This configuration requires two network adapters on the VM and the Deployment IP will be on the second one. • IP address: This is the IP address used by the deployment engine within the appliance. It is used to communicate with a target server’s deployment interface IP address.
4 Updating from version 7.2.2 to 7.3.1 If you are a NEW customer, follow the instructions in “Installing your Insight Control server provisioning appliance for the first time” (page 14) to download and install a full Insight Control server provisioning appliance. If you are an EXISTING customer with HP Insight Control server provisioning 7.2.2 installed, follow the instructions in this section for updating your Insight Control server provisioning appliance from 7.2.2 to 7.3.1.
Check for adequate disk space on your VM host file store An update uses a lot of disk space on your appliance. If your current appliance was installed using thin provisioning (which is not recommended), the update will cause the virtual disk to grow substantially. It is very important you make sure there is at least 180GB of free space available on your host disk to allow for virtual disk expansion.
NOTE: The ZIP files of the 7.3.1 Full Appliance are also available for download and on the media but you should NOT install a full appliance over an existing installation as this will result in loss of data. HP recommends you verify the MD5 checksum of the downloaded ZIP file with the checksum listed on the HP Software Depot website. 2. Next, UNZIP the file into a location that can be accessed from the Insight Control server provisioning UI.
the file via REST calls, you can then use any supported browser to install the update from the UI. ◦ For the second file you upload, IC-server-provisioning-7.3.1-update.bin, if you want to do the upload via the UI you must use Firefox or Chrome. If you do not have access to these browsers or you prefer to do the file upload from a command line, you can use the documented REST calls to upload the file from a Windows or Linux command line. See “REST API call to upload the update file” (page 34).
NOTE: You must use the Upload Only button to upload the 7.2.2 patch. The Upload and Install button has a known issue in a 7.2.2 appliance and will generate the following error: “Unable to locate the page you requested”. As the file is uploaded, you will see an uploading progress bar in the Update Appliance dialog box. There is a Close button if you want to stop the file upload.
10. The file upload and validation is complete when the file name and version is displayed in the Appliance Update dialog box, along with information on how long it will take to install the uploaded file and whether a restart is required. You can click the Release Notes link to read the release notes. The Release Notes link does not work in the Chrome browser. Use Firefox or you can find the release notes in the ZIP download for the update or on the media.
• Copy any additional OS distributions supported in the 7.3.1 update to your Media Server file share. The Media Server setup utility is updated to support the new media. See “Setting up the Media Server” (page 41) for details. • Generate and upload WinPE to the appliance. Follow the instructions in the “Generating and uploading WinPE to the appliance” (page 48). You should generate and upload a new WinPE even if you already did this when initially setting up your appliance.
The REST API allows you to upload a file to your appliance, and then you can use the Update Appliance screen to install the update. Refer to the HP Insight Control Server Provisioning Administrator Guide chapter on Advanced Topics for more information on REST APIs. This section includes examples using cURL, as well as a sample PowerShell script that can be used for uploading files to the appliance. NOTE: cURL is part of most Linux installations and can be downloaded for Windows at http:// curl.haxx.se/.
• -F file="@/home/user/IC-server-provisioning-7.3.1–update.bin" (Linux) When a successful Response Body has been seen, after about 10-15 minutes, you can proceed to use the UI to install the update. From the Settings screen, select Actions→Update Appliance. You should see information stating that the update file has been uploaded. See the “Instructions for updating from 7.2.2 to 7.3.1” (page 31). If you uploaded the IC-server-provisioning-7.2.2-patch.
######################################################################################### # attempt to login and exit if error during login. Write-Host "Sending login request.." $loginresponse = $webclient.uploadString($loginurl, $loginbody) if( !$loginresponse) { Write-Host "*** ERROR *** Login Failed"; exit; } Write-Host " login successful" ######################################################################################### # extract token from response $bodytokens = $loginresponse.
5 DHCP server setup A DHCP server is always required with IC server provisioning. Although deployments can be performed without PXE when using HP ProLiant Gen8 and newer servers, DHCP is still required for IC server provisioning in all cases.
• Will always provide extended information required for PXE booting target servers. • Can properly PXE boot a server in UEFI mode. External DHCP server An external DHCP server might make sense in the following cases: • You already have a DHCP server on your network • You require more advanced features than you can configure using the appliance UI.
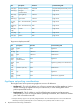
3. 4. Right-click on IPv4 and select Set Predefined Options... From that screen, you can add the following options to your DHCP server IPv4 global settings: Code Option name Data type 186 buildmgr_ip IP Address 187 buildmgr_port Word In your DHCP scope, right-click on Scope Options and select Configure Options.. to assign the following values to the DHCP options: Option number Option name Option value 66 Boot server 67 Boot filename pxelinux.
6 Setting up the Media Server The following sections provide a description of the Media Server and the Media Server setup utility and instructions for how to use the Insight Control server provisioning Media Server setup utility to create your Media Server. The Media Server setup utility can be downloaded from the appliance UI and is also available in the product ZIP file your appliance was delivered in and on the media.
Every time your IC server provisioning appliance is updated, a new version of Media Server setup utility will be included. You should always make sure you are using the latest version of this utility each time you use it.
Procedure for using the Insight Control server provisioning Media Server setup utility Follow these procedures to use the Insight Control server provisioning Media Server setup utility: 1. Make sure you have met the requirements specified in “Requirements for setting up your Media Server” (page 42) 2. Download the Insight Control server provisioning Media Server setup utility from the Settings→Edit Media Server screen by clicking Download Insight Control server provisioning Media Server setup utility.
Figure 12 Insight Control server provisioning Media Server setup utility Components Selection NOTE: You may run the Insight Control server provisioning Media Server setup utility any number of times to selectively install media or to fix failed media installations. 10. From the Parameters screen shown below, specify the following information: • Windows File Share Name Specify the name you wish to use for the Windows file share.
The file share name and the user name cannot contain the following reserved characters: < (less than) > (greater than) : (colon) " (double quote) / (forward slash) \ (backslash) | (vertical bar or pipe) ? (question mark) * (asterisk) [ (open square bracket) ] (close square bracket) ; (semicolon) = (equal sign) , (comma) + (plus) & (ampersand) ~ (tilde) ? (Question mark) (null) and No leading or trailing space. The password cannot be (null) or contain leading or trailing space or " (double quote).
Figure 14 Insight Control server provisioning Media Server setup utility Distribution Installation Specify the following: • Prerequisites Prerequisites are automatically verified. If the prerequisites are not met for the media, an error will be displayed and setup will not continue. • Options Items in this area depend on the media being installed.
• When setup has completed, select Close. The Insight Control server provisioning Media Server setup utility will automatically begin setting up the next media if there are more to set up. 12. When all media have been installed, each installation will have either a success (green), installed with warnings (yellow), or installation failed (red) status on the Select OS Distributions to Install screen. Check the log file for details. 13.
7 Generating and uploading WinPE to the appliance A version of WinPE needs to be built and uploaded to the appliance for most people performing Windows installations or operations. Beginning with version 7.3.1, you must choose which version of WinPE to upload; WinPE 4.0 or WinPE 3.1. The following information will help you decide which version to use and how to create and upload it.
WinPE. This must be done when you first install the appliance and after every appliance update. HP provides a WinPE Generation utility for each version of WinPE, which runs on a Windows system and creates a zip file containing WinPE and some utilities. This zip file is what gets uploaded to the appliance. You must build and upload WinPE to your appliance before you can perform any of the following operations: • Any PXE boot of the WinPE Service OS. • Any Windows installations using PXE.
Procedure for generating WinPE images Follow these procedures to generate WinPE images. 1. Make sure you have met the requirements specified in “Requirements for generating WinPE images” (page 49). 2. Use the WinPE generation utility to generate WinPE. 3. Launch the WinPE generated file (for example, icsp-winpe-generate-). 4. From the HP Install Package dialog, select Run shown below. Figure 15 Insight Control server provisioning WinPE image generation utility Welcome 5. 6.
Figure 16 Insight Control server provisioning WinPE image generation utility Setup 7. Once the WinPE file has been generated, it is placed in %SystemDrive%\icsp-winpe.zip, where %SystemDrive% is generally C:. The dialog box shown below will be displayed (The WinPE 4.0 screen is shown, the WinPE 3.1 screen will be slightly different.).
8. 52 Upload the WinPE generated file to the appliance. In the WinPE upload area of the Settings DHCP screen, either drag and drop your WinPE file to the box or select Upload file to browse to the WinPE file.
8 Recommended actions after initial setup Once the IC server provisioning VM is up and running, additional configuration tasks may be need to be configured in your environment. These Recommended actions are listed in the Help area. As you visit the links as shown in the following figure under Recommended actions, a check mark will be displayed next to those items visited. You do not have to complete the task to have the check mark appear, simply visit the link.
expect these keys. If you do not enter your product keys on this screen, you must modify the HP-provided configuration files before they will work properly. • Configure DHCP – Links to the Settings→Edit DHCP screen where you can configure your DHCP settings and upload the required WinPE service OS to the appliance. A DHCP server is required in order to provision servers. You may use the internal DHCP server supplied with the appliance or an external DHCP server.
9 Support and other resources Contacting HP Before you contact HP Be sure to have the following information available before you contact or call your authorized support representative: • Technical support registration number (if applicable) • Insight Control server provisioning version • Applicable error message • Third-party hardware or software • Operating system type and revision level • Support dump (optional): “Creating a support dump” (page 55) Creating a support dump When you might want t
• NTP servers Information about the running appliance, including: • All processes • Memory • Disk space • Network statistics • Routing • Hardware information Log data, including: • All standard Linux operating system logs • All appliance logs • Logs from all jobs run in the past three days • Installation logs • The system audit log Other information: • Status report of all processes • Dates of any certificates used NOTE: The following types of items might be included in the suppo
notification of product enhancements, new driver versions, firmware updates, and other product resources. Related information Documents The following documents are available at http://www.hp.com/go/insightcontrol/docs. • HP Insight Control Server Provisioning Online Help (in PDF form) • HP Insight Control Server Provisioning Administrator Guide • Technical White Papers for Insight Control server provisioning Websites • Software download website: http://www.hp.
WARNING A warning calls attention to important information that if not understood or followed will result in personal injury or nonrecoverable system problems. CAUTION A caution calls attention to important information that if not understood or followed will result in data loss, data corruption, or damage to hardware or software.
10 Documentation feedback HP is committed to providing documentation that meets your needs. To help us improve the documentation, send any errors, suggestions, or comments to Documentation Feedback (docsfeedback@hp.com). Include the document title and part number, version number, or the URL when submitting your feedback.
A Updating from version 7.2 or 7.2.1 to 7.2.2 This appendix contains the excerpt from the Insight Control Server Provisioning 7.2 Update 2 Install Guide on how to update your appliance from version 7.2 or 7.2.1 to 7.2.2. The information is included here for the convenience of customers currently on version 7.2 or 7.2.1 who will need to first update to 7.2.2 and then use the instructions in “Updating from version 7.2.2 to 7.3.1” (page 28) to update to 7.3.1. Also for your convenience the update .
Dedicate resources to the appliance Another option to ensure your appliance has the resources it needs, is to use the VMware settings to dedicate CPU and memory resources to your appliance. In the resources tab of your VM settings, set a reservation for at least 8000 MHz of CPU and 16384MB of memory. This is particularly helpful if you cannot perform the update during a maintenance period. When the update is complete, you can remove these reservations.
7.2.2 then you install the IC-server-provisioning-7.2.1-patch.bin file first and then the IC-server-provisioning-7.2.2-update.bin file. • IC-server-provisioning-7.2.0-patch.bin — patches the current 7.2 version • IC-server-provisioning-7.2.1-patch.bin — patches the current 7.2.1 version • IC-server-provisioning-7.2.2-update.bin — updates to a new 7.2.2 version Continue to check your prerequisites and then begin the update. Prerequisites for update from 7.2/7.2.1 to 7.2.
NOTE: If you are starting from 7.2.0 release appliance, the appliance version will be 7.2.0–50506, before you install the patch. If you are starting from 7.2.1 release appliance, the appliance version will be 7.2.1–60611, before you install the patch. As the file is uploaded, you will see an uploading progress bar in the Update Appliance dialog box. There is a Cancel button if you want to stop the file upload.
you return to the Update Appliance dialog box, you will be able to pick up where you left off (post-upload and pre-install). NOTE: If you cancel an upload or remove an uploaded file, you must clear your browser cache and restart your browser before you attempt another upload. NOTE: When uploading the file, if you see an error message like this: “Error occurred while verifying image file: ICsp_7.2.2-update.bin is corrupted. Please download image file and try again.” you can take the following actions: 8.
• Read about the build plan changes and consider updating your custom build plans (see the Insight Control server provisioning All About OS Build Plans and Steps white paper available at http://www.hp.com/go/insightcontrol/docs). • Build Plans for HP Insight Control server provisioning version 7.2.2 or newer will use the following format for Windows, RHEL, and SLES: “ProLiant Drivers for ”. This convention permits maintenance of multiple driver packages on the same appliance.
NOTE: The system may return you to the Settings screen before the shut down happens. Do not press any buttons. Just stay on this screen until the appliance begins to shut down. It may take a few minutes. NOTE: During the shut down, your VM may not completely power off. It may stop on a screen that says "Appliance is starting". If you see this screen and it does not change for 30 seconds, you can safely power off the VM. 6. 7.
REST component Description -F file=”@c:/IC-server-provisioning-7.2.2-update.bin” (Windows) -F file="@/home/user/IC-server-provisioning-7.2.2–update.bin" (Linux) Response Body: An example of the response is shown below, file name and version will depend on the upload: {"fileName":"IC-server-provisioning-7.2.2-update.bin","version":"7.2.
Glossary agent Software on managed servers used to make changes to the servers. Functions supported include software installation and removal, software and hardware configuration, and server status reporting. answer file See configuration file. appliance See virtual appliance. AutoYaST file The specific term to use when referring to a SLES configuration file. bare metal Describes a server that does not have a production operating system installed.
HPSUM HP Smart Update Manager, a common tool for firmware and driver updates. iLO See Integrated Lights-Out (iLO). iLO Virtual Media An HP Integrated Lights-Out (iLO) feature that allows you to attach a removable storage device or image file from a client machine to the server, and have that appear to the server as a local device. The server can boot from that virtual device or use it with a running operating system.
OS personalization The process of giving a running server the characteristics that make it unique, including IP configuration, host name, and domain. A server can be personalized during the initial OS deployment or after the OS is already installed. package A single compressed (zipped) file that can contain executables, configuration information, and script files. An example of a package is a .zip file of Windows drivers to be used during unattended installations. preboot environment See service OS.
See also maintenance mode, provisioned, and unreachable. service OS A special purpose operating system that runs entirely in system memory and is used to perform various maintenance functions on a server, including preparing a system for operating system installation. Insight Control server provisioning has service OS's based on Linux and Windows. See also LinuxPE and WinPE. SLES Stands for SUSE Linux Enterprise Server. A Linux-based operating system developed by SUSE. software package See package.
Index D DHCP server internal or external, 38 setup external to appliance, 39 DHCP server setup, 38 documentation providing feedback on, 59 F files serverdeployment.