
Extending ICE-Linux Monitoring


6
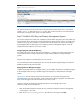
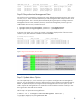
3. When processing is complete, select the Tasks & Logs→View Task Results menu item to review the
log files to determine if the operation was successful.
4. Click the Stdout and Stderr tabs on the tasks results screen to see more information. The
operation is successful if the exit code is 0 (zero):
Status: Complete
Exit code: 0
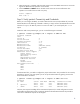
Step 3: Verify ipmitool Connectivity and Credentials
Before you can configure the BMC, you need to determine the version and IP address of your IPMI
based LAN device. The following command is arbitrary; it simply verifies if the authentication and the
selection of lanplus for IPMI v2 protocol is correct. For IPMI v1 you would specify the –I lan
option.
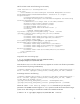
With the IP and correct protocol type, you can run the following test command:
# ipmitool -H demos-cp.example.com -I lanplus -U admin mc info
Password: ********
info
Device ID : 0
Device Revision : 3
Firmware Revision : 1.25
IPMI Version : 2.0
Manufacturer ID : 3973
Manufacturer Name : Unknown (0xf85)
Product ID : 0 (0x0000)
Device Available : yes
Provides Device SDRs : no
Additional Device Support :
Sensor Device
SDR Repository Device
SEL Device
FRU Inventory Device
IPMB Event Receiver
Bridge
Chassis Device
Aux Firmware Rev Info :
0x00
0x00
0x00
0x30
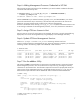
If authentication fails, you need to configure the proper authorization. The procedure for this varies by
IPMI device, however. For most systems you can set up the authorizations by gaining access to the
IPMI console device as follows:
# ipmitool -H demos-cp.example.com -I lanplus -U admin user list
Password:
ID Name Callin Link Auth IPMI Msg Channel Priv Limit
1 false true true Unknown (0x0)
2 Operator false true true Unknown (0x0)
3 admin false true true Unknown (0x0)
However, this requires knowledge of the username and password, so initial configuration must be
performed through the IPMI console. Consult the hardware documentation because this procedure
varies and is outside the scope of this white paper.