
HP Insight Cluster Management Utility v7.2 User Guide
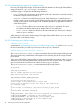

Table Of Contents
- HP Insight Cluster Management Utility v7.2
- Contents
- 1 Overview
- 2 Installing and upgrading HP Insight CMU
- 2.1 Installing HP Insight CMU
- 2.1.1 Management node hardware requirements
- 2.1.2 Disk space requirements
- 2.1.3 Support for non-HP servers
- 2.1.4 Planning for compute node installation
- 2.1.5 Firmware upgrade requirements
- 2.1.6 Configuring the local smart array card
- 2.1.7 Configuring the management cards
- 2.1.8 Configuring the BIOS
- 2.2 Preparing for installation
- 2.3 Installation procedures
- 2.4 Installing HP Insight CMU with high availability
- 2.5 Upgrading HP Insight CMU
- 2.5.1 Upgrading to v7.2 important information
- 2.5.2 Dependencies
- 2.5.3 Stopping the HP Insight CMU service
- 2.5.4 Upgrading Java Runtime Environment
- 2.5.5 Removing the previous HP Insight CMU package
- 2.5.6 Installing the HP Insight CMU v7.2 package
- 2.5.7 Installing your HP Insight CMU license
- 2.5.8 Restoring the previous HP Insight CMU configuration
- 2.5.9 Configuring the updated UP Insight CMU
- 2.5.10 Starting HP Insight CMU
- 2.5.11 Deploying the monitoring client
- 2.6 Saving the HP Insight CMU database
- 2.7 Restoring the HP Insight CMU database
- 2.1 Installing HP Insight CMU
- 3 Launching the HP Insight CMU GUI
- 4 Defining a cluster with HP Insight CMU
- 5 Provisioning a cluster with HP Insight CMU
- 5.1 Logical group management
- 5.2 Autoinstall
- 5.3 Backing up
- 5.4 Cloning
- 5.5 Node static info
- 5.6 Rescan MAC
- 5.7 HP Insight CMU image editor
- 5.8 HP Insight CMU diskless environments
- 5.8.1 Overview
- 5.8.2 The system-config-netboot diskless method
- 5.8.2.1 Operating systems supported
- 5.8.2.2 Installing the operating system on the management node and the golden node
- 5.8.2.3 Modifying the TFTP server configuration
- 5.8.2.4 Populating the HP Insight CMU database
- 5.8.2.5 Creating a diskless image
- 5.8.2.6 Creating a diskless logical group
- 5.8.2.7 Adding nodes into the logical group
- 5.8.2.8 Booting the compute nodes
- 5.8.2.9 Understanding the structure of a diskless image
- 5.8.2.10 Customizing your diskless image
- 5.8.2.11 Best practices for diskless clusters
- 5.8.3 The HP Insight CMU oneSIS diskless method
- 5.8.3.1 Operating systems supported
- 5.8.3.2 Enabling oneSIS support
- 5.8.3.3 Preparing the HP Insight CMU management node
- 5.8.3.4 Preparing the golden node
- 5.8.3.5 Capturing and customizing a oneSIS diskless image
- 5.8.3.6 Manage the writeable memory usage by the oneSIS diskless clients
- 5.8.3.7 Adding nodes and booting the diskless compute nodes
- 5.8.4 Scaling out an HP Insight CMU diskless solution with multiple NFS servers
- 6 Monitoring a cluster with HP Insight CMU
- 6.1 Installing the HP Insight CMU monitoring client
- 6.2 Deploying the monitoring client
- 6.3 Monitoring the cluster
- 6.4 Stopping HP Insight CMU monitoring
- 6.5 Customizing HP Insight CMU monitoring, alerting, and reactions
- 6.5.1 Action and alert files
- 6.5.2 Actions
- 6.5.3 Alerts
- 6.5.4 Alert reactions
- 6.5.5 Modifying the sensors, alerts, and alert reactions monitored by HP Insight CMU
- 6.5.6 Using collectl for gathering monitoring data
- 6.5.7 Monitoring GPUs and coprocessors
- 6.5.8 Monitoring HP Insight CMU alerts in HP Systems Insight Manager
- 6.5.9 Extended metric support
- 7 Managing a cluster with HP Insight CMU
- 7.1 Unprivileged user menu
- 7.2 Administrator menu
- 7.3 SSH connection
- 7.4 Management card connection
- 7.5 Virtual serial port connection
- 7.6 Shutdown
- 7.7 Power off
- 7.8 Boot
- 7.9 Reboot
- 7.10 Change UID LED status
- 7.11 Multiple windows broadcast
- 7.12 Single window pdsh
- 7.13 Parallel distributed copy (pdcp)
- 7.14 User group management
- 7.15 HP Insight firmware management
- 7.16 Customizing the GUI menu
- 7.17 HP Insight CMU CLI
- 8 Advanced topics
- 9 Support and other resources
- A Troubleshooting
- HP Insight CMU manpages
- cmu_boot(8)
- cmu_show_nodes(8)
- cmu_show_logical_groups(8)
- cmu_show_network_entities(8)
- cmu_show_user_groups(8)
- cmu_show_archived_user_groups(8)
- cmu_add_node(8)
- cmu_add_network_entity(8)
- cmu_add_logical_group(8)
- cmu_add_to_logical_group_candidates(8)
- cmu_add_user_group(8)
- cmu_add_to_user_group(8)
- cmu_change_active_logical_group(8)
- cmu_change_network_entity(8)
- cmu_del_from_logical_group_candidates(8)
- cmu_del_from_network_entity(8)
- cmu_del_archived_user_groups(8)
- cmu_del_from_user_group(8)
- cmu_del_logical_group(8)
- cmu_del_network_entity(8)
- cmu_del_node(8)
- cmu_del_snapshots(8)
- cmu_del_user_group(8)
- cmu_console(8)
- cmu_power(8)
- cmu_custom_run(8)
- cmu_clone(8)
- cmu_backup(8)
- cmu_scan_macs(8)
- cmu_rescan_mac(8)
- cmu_mod_node(8)
- cmu_monstat(8)
- cmu_image_open(8)
- cmu_image_commit(8)
- cmu_config_nvidia(8)
- cmu_config_amd(8)
- cmu_config_intel(8)
- cmu_mgt_config(8)
- cmu_firmware_mgmt(8)
- cmu_monitoring_dump(8)
- cmu_rename_archived_user_group(8)
- Glossary
- Index

If you want to select the current running kernel as the kernel to boot diskless, then provide the
CURRENT keyword (for example, –k CURRENT ).
If any errors occur during the creation of the golden image, the logical group will not be created
in HP Insight CMU. Correct the errors and recreate the diskless logical group.
5.8.3.5.2 Customizing an HP Insight CMU oneSIS diskless image
An HP Insight CMU oneSIS diskless image can be managed in two ways: manually and
automatically. The system administrator can manually make changes to the golden image. This is
a quick way to get a diskless image ready for deployment. The downside is that these changes
are not preserved.
The other way to manage an HP Insight CMU oneSIS diskless image is to script changes to occur
automatically when the image is created. Scripting these changes allows the system administrator
to update the software on the golden node and extract new diskless golden images without manually
repeating the previous customizations. The HP Insight CMU oneSIS diskless image creation process
provides support for scripting any customizations to the golden image.
Before making any manual customizations to this golden image, HP strongly recommends that you
read and become familiar with the "oneSIS-HOWTO" documentation section on the http://
onesis.org website. This documentation explains the file system layout of the read-only oneSIS
golden image and how to configure oneSIS to manage per-node file changes in this golden image.
You must not change any settings that specifically support the oneSIS diskless environment.
When an HP Insight CMU oneSIS diskless logical group is created for the first time, the contents
of the /opt/cmu/image/<logical_group_name>/ directory are populated with the
appropriate support infrastructure. After creating an HP Insight CMU oneSIS diskless image for
the first time, familiarize yourself with the HP Insight CMU oneSIS diskless image support:
[root@cmumaster ~]# cd /opt/cmu/image/centos63-onesis
[root@cmumaster centos63-onesis]# ls -l
total 28
-rw-r--r-- 1 root root 692 Sep 18 09:04 files
-rw-r--r-- 1 root root 250 Sep 18 09:04 files.customd
rwxr-xr-x 2 root root 4096 Sep 18 09:05 onesis
drwxr-xr-x 3 root root 4096 Sep 18 09:05 onesis_pxeboot
-rw-r--r-- 1 root root 268 Sep 18 09:04 onesis_pxeboot_template
-rwxr-xr-x 1 root root 2570 Sep 18 09:04 reconf-onesis-image.sh
-rwxr-xr-x 1 root root 2115 Sep 18 09:04 reconf-onesis-snapshot.sh
[root@cmumaster centos63-onesis]#
The files file contains the list of files and directories identified by HP Insight CMU as writable
by default for all Linux distributions. This file may be updated with HP Insight CMU patches or
updates. It is overwritten automatically each time the diskless logical group is re-created, so this
file should not be modified. These files and directories are automatically configured in the onesis/
etc/sysimage.conf file and when the mk-sysimage
/opt/cmu/image/<logical_group_name>/onesis command is run during the diskless
image creation process (when you add the logical group to HP Insight CMU).
An additional list of files and directories can be configured in the files.custom file to be writable
whenever the diskless logical group is created. You can also add files and directories directly to
the oneSIS image by manually modifying the onesis/etc/sysimage.conf file and then running
the mk-sysimage /opt/cmu/image/<logical_group_name>/onesis command, but the
files.custom file is recommended to enable repeatability.
The onesis directory contains the root file system for the golden image. This directory is
automatically configured to be exported as read-only through NFS during the image creation
process. You can update the contents of this directory but you must respect the alterations made
by the oneSIS process. These alterations are discussed in detail in the "oneSIS-HOWTO"
documentation section of http://onesis.org website. The alterations consist of soft links in place of
files and directories renamed to support the in-memory writable file system created at bootup.
80 Provisioning a cluster with HP Insight CMU