
HP Insight Cluster Management Utility v7.2 User Guide
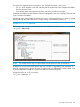
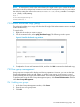
Table Of Contents
- HP Insight Cluster Management Utility v7.2
- Contents
- 1 Overview
- 2 Installing and upgrading HP Insight CMU
- 2.1 Installing HP Insight CMU
- 2.1.1 Management node hardware requirements
- 2.1.2 Disk space requirements
- 2.1.3 Support for non-HP servers
- 2.1.4 Planning for compute node installation
- 2.1.5 Firmware upgrade requirements
- 2.1.6 Configuring the local smart array card
- 2.1.7 Configuring the management cards
- 2.1.8 Configuring the BIOS
- 2.2 Preparing for installation
- 2.3 Installation procedures
- 2.4 Installing HP Insight CMU with high availability
- 2.5 Upgrading HP Insight CMU
- 2.5.1 Upgrading to v7.2 important information
- 2.5.2 Dependencies
- 2.5.3 Stopping the HP Insight CMU service
- 2.5.4 Upgrading Java Runtime Environment
- 2.5.5 Removing the previous HP Insight CMU package
- 2.5.6 Installing the HP Insight CMU v7.2 package
- 2.5.7 Installing your HP Insight CMU license
- 2.5.8 Restoring the previous HP Insight CMU configuration
- 2.5.9 Configuring the updated UP Insight CMU
- 2.5.10 Starting HP Insight CMU
- 2.5.11 Deploying the monitoring client
- 2.6 Saving the HP Insight CMU database
- 2.7 Restoring the HP Insight CMU database
- 2.1 Installing HP Insight CMU
- 3 Launching the HP Insight CMU GUI
- 4 Defining a cluster with HP Insight CMU
- 5 Provisioning a cluster with HP Insight CMU
- 5.1 Logical group management
- 5.2 Autoinstall
- 5.3 Backing up
- 5.4 Cloning
- 5.5 Node static info
- 5.6 Rescan MAC
- 5.7 HP Insight CMU image editor
- 5.8 HP Insight CMU diskless environments
- 5.8.1 Overview
- 5.8.2 The system-config-netboot diskless method
- 5.8.2.1 Operating systems supported
- 5.8.2.2 Installing the operating system on the management node and the golden node
- 5.8.2.3 Modifying the TFTP server configuration
- 5.8.2.4 Populating the HP Insight CMU database
- 5.8.2.5 Creating a diskless image
- 5.8.2.6 Creating a diskless logical group
- 5.8.2.7 Adding nodes into the logical group
- 5.8.2.8 Booting the compute nodes
- 5.8.2.9 Understanding the structure of a diskless image
- 5.8.2.10 Customizing your diskless image
- 5.8.2.11 Best practices for diskless clusters
- 5.8.3 The HP Insight CMU oneSIS diskless method
- 5.8.3.1 Operating systems supported
- 5.8.3.2 Enabling oneSIS support
- 5.8.3.3 Preparing the HP Insight CMU management node
- 5.8.3.4 Preparing the golden node
- 5.8.3.5 Capturing and customizing a oneSIS diskless image
- 5.8.3.6 Manage the writeable memory usage by the oneSIS diskless clients
- 5.8.3.7 Adding nodes and booting the diskless compute nodes
- 5.8.4 Scaling out an HP Insight CMU diskless solution with multiple NFS servers
- 6 Monitoring a cluster with HP Insight CMU
- 6.1 Installing the HP Insight CMU monitoring client
- 6.2 Deploying the monitoring client
- 6.3 Monitoring the cluster
- 6.4 Stopping HP Insight CMU monitoring
- 6.5 Customizing HP Insight CMU monitoring, alerting, and reactions
- 6.5.1 Action and alert files
- 6.5.2 Actions
- 6.5.3 Alerts
- 6.5.4 Alert reactions
- 6.5.5 Modifying the sensors, alerts, and alert reactions monitored by HP Insight CMU
- 6.5.6 Using collectl for gathering monitoring data
- 6.5.7 Monitoring GPUs and coprocessors
- 6.5.8 Monitoring HP Insight CMU alerts in HP Systems Insight Manager
- 6.5.9 Extended metric support
- 7 Managing a cluster with HP Insight CMU
- 7.1 Unprivileged user menu
- 7.2 Administrator menu
- 7.3 SSH connection
- 7.4 Management card connection
- 7.5 Virtual serial port connection
- 7.6 Shutdown
- 7.7 Power off
- 7.8 Boot
- 7.9 Reboot
- 7.10 Change UID LED status
- 7.11 Multiple windows broadcast
- 7.12 Single window pdsh
- 7.13 Parallel distributed copy (pdcp)
- 7.14 User group management
- 7.15 HP Insight firmware management
- 7.16 Customizing the GUI menu
- 7.17 HP Insight CMU CLI
- 8 Advanced topics
- 9 Support and other resources
- A Troubleshooting
- HP Insight CMU manpages
- cmu_boot(8)
- cmu_show_nodes(8)
- cmu_show_logical_groups(8)
- cmu_show_network_entities(8)
- cmu_show_user_groups(8)
- cmu_show_archived_user_groups(8)
- cmu_add_node(8)
- cmu_add_network_entity(8)
- cmu_add_logical_group(8)
- cmu_add_to_logical_group_candidates(8)
- cmu_add_user_group(8)
- cmu_add_to_user_group(8)
- cmu_change_active_logical_group(8)
- cmu_change_network_entity(8)
- cmu_del_from_logical_group_candidates(8)
- cmu_del_from_network_entity(8)
- cmu_del_archived_user_groups(8)
- cmu_del_from_user_group(8)
- cmu_del_logical_group(8)
- cmu_del_network_entity(8)
- cmu_del_node(8)
- cmu_del_snapshots(8)
- cmu_del_user_group(8)
- cmu_console(8)
- cmu_power(8)
- cmu_custom_run(8)
- cmu_clone(8)
- cmu_backup(8)
- cmu_scan_macs(8)
- cmu_rescan_mac(8)
- cmu_mod_node(8)
- cmu_monstat(8)
- cmu_image_open(8)
- cmu_image_commit(8)
- cmu_config_nvidia(8)
- cmu_config_amd(8)
- cmu_config_intel(8)
- cmu_mgt_config(8)
- cmu_firmware_mgmt(8)
- cmu_monitoring_dump(8)
- cmu_rename_archived_user_group(8)
- Glossary
- Index

HP Insight CMU provides the latest conrep kit available at release time. If a different or newer
version of conrep is required for the servers in your cluster, you can configure the full path and
file name of the correct conrep binary by editing the CMU_BIOS_SETTINGS_TOOL variable in
/opt/cmu/etc/cmuserver.conf.
The conrep tool also requires an XML file containing the information necessary to interpret the
BIOS flash memory data on your server into human-readable text. HP Insight CMU is pre-configured
with the most common XML file, but depending on your server type this common XML file might
not be compatible with your servers. If your servers require a special XML file, configure the
CMU_BIOS_SETTINGS_FILE variable in /opt/cmu/etc/cmuserver.conf to the full path
and file name of the correct XML file.
NOTE: The conrep tool is a 32-bit binary that requires 32-bit glibc and XML support from the
OS. If you do not have these packages installed on the selected nodes, you will receive errors
identifying the required dependencies.
The BIOS settings are extracted to a local file on each node. Display the contents of those files
using the cmu_dsh command with the CMU_Diff filter. This allows the user to identify different
settings across the set of chosen nodes.
Located in /opt/cmu/tmp/conrep/ on each selected node:
• A copy of the conrep binary
• A copy of the conrep XML file
• The file containing the BIOS settings
7.15.2 Checking BIOS versions
To check the BIOS version on sets of chosen nodes, HP Insight CMU extracts the BIOS Vendor,
Version, and Release Date fields from the output of dmidecode and concatenates them with
hyphens to form a single string. These strings are aggregated with the cmu_dsh command and
filtered using dsh_bak to provide a condensed display of the sets of nodes running common BIOS
versions.
7.15.3 Installing and upgrading firmware
Most HP servers provide the ability to upgrade the firmware while the server is running by invoking
an online ROM flash executable, or firmware executable. This is a Linux executable that tests for
the correct server type and installs a newer version of the firmware.
You can obtain this firmware executable from the Support & Drivers link from http://www.hp.com.
Copy it to /opt/cmu/firmware/. Then you can use HP Insight CMU to select the nodes to
upgrade, and these binaries are copied and executed in parallel. By default HP Insight CMU
executes these binaries with the -s option, which tells the binary to run in script mode. If
necessary, you can change the arguments by editing the
CMU_FIRMWARE_EXECUTABLE_ARGUMENTS variable in /opt/cmu/etc/cmuserver.conf.
HP recommends installing the firmware executable on one node first, to test the operation. After
the binary finishes executing, you must reboot the node for the new firmware to take effect. If this
process is successful, then you can use HP Insight CMU to duplicate this process on a larger set
of nodes.
7.16 Customizing the GUI menu
You can add your own menu options to the HP Insight CMU GUI. For more information, see the
file /opt/cmu/etc/cmu_custom_menu. This file includes instructions on including your GUI
menu option and provides commented ready to use examples.
When you add a custom GUI option, the corresponding command is also available from /opt/
cmu/cmucli. For example:
7.16 Customizing the GUI menu 127