Contents Overview ······································································································································································ 1 Installing the iNode client············································································································································ 2 Installation prerequisites ·······························································································································
Overview iNode intelligent client (hereafter referred to as iNode client) is a client access software for Windows users. It is used with Ethernet switches or routers, and cooperates with intelligent management center (iMC) User Access Manager Component (UAM)/Endpoint Admission Defense (EAD) to authenticate and check broadband access users. The iNode client supports the following protocols for authenticating users: • 802.
Installing the iNode client Installation prerequisites The iNode client can run in the following Windows operating systems: 1. 32-bit operating systems • Windows 2000 Professional • Windows 2000 Server • Windows XP • Windows Server 2003 • Windows Vista • Windows 7 2. 64-bit operating systems • Windows XP 64-bit • Windows Vista 64-bit • Windows 7 64-bit NOTE: Unified authentication is not available in the 32-bit Windows Vista and Windows 7, or 64-bit Windows operating systems.
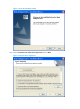
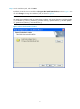
Figure 1 Launch the installation wizard Step2 Select I accept the terms of the license agreement and click Next.
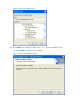
Step3 Set the installation path, and click Next. By default, the iNode client is installed to C:\Program Files\iNode\iNode Client, as shown Figure 3. You can click Change to change the installation path, as shown in Figure 4. NOTE: The iNode client installation path can contain letters, numbers, and special characters, excluding slashes (/), backslashes (\), colons (:), asterisks (*), question marks (?), quotation marks (“”), less-than symbols (<), greater-than symbols (>), and vertical bars (|).
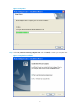
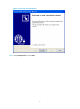
Figure 4 Choose the installation path Step4 Click Install to start installing the iNode client. Figure 6 shows the installation process. You can click Back to change the previous settings.
Figure 6 Setup status Step5 Select Yes, I want to restart my computer now. and click Finish, or restart your computer later.
Step6 Restart your computer.
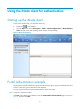
Using the iNode client for authentication Starting up the iNode client To start up the iNode client, you can follow either way: on your desktop. • Double-click • From the Start menu, select All Programs > iNode > iNode Intelligent Client > iNode Intelligent Client. The path varies with operating system versions and style settings. Figure 8 iNode client interface Portal authentication example iNode supports multiple authentication protocols and connection types.
Figure 9 Create new connection wizard Step2 Select Portal protocol and click Next.
Figure 10 Select an authentication protocol Step3 Select Common connection and click Next.
Figure 11 Select a connection type Step4 Figure 12 shows the iNode client is automatically obtaining the portal server information.
Figure 12 Obtain the portal server information Step5 Specify the basic portal connection attributes, and click Next.
Figure 13 Basic portal connection attributes NOTE: Available options in the Service type dropdown list are configured in iMC. If the option is grayed out, the iNode fails to connect to the portal server. In this case, contact the administrator to check the server configuration or check the local network. Step6 Click Create to create the connection. If you select the Add a shortcut to this connection to my desktop check box, you can double-click the shortcut to launch the connection.
Figure 14 Complete the new connection wizard Step7 Use the iNode client to initiate authentication. Double-click the new connection to enter the page as shown in Figure 15, confirm the account information, and click Connect.
Figure 15 Confirm the authentication information Step8 Verify that you have passed the authentication. The authentication information in Figure 16 shows that you have passed authentication and the security check and can access the network.
Figure 16 Pass the authentication 16
Uninstalling the iNode client To uninstall the iNode client, follow these steps: Step1 From the Start menu, select All Programs > iNode > iNode Intelligent Client > Repair or Uninstall iNode Intelligent Client. Step2 On the page shown in Figure 17, select Remove and click Next. Figure 17 Uninstall the iNode client Step3 Click Yes to confirm your operation. Figure 18 Confirmation dialog box Step3 Save the user connection information.
Figure 19 Confirmation dialog box Step4 Select Yes, I want to restart my computer now. and click Finish, or restart your computer later. Figure 20 Complete the removal Step5 Restart your computer.
FAQ What is the difference between installing an iNode client in Windows Vista or Windows 7 and that in Windows XP? A dialog box shown in Figure 21 may appear when you install the iNode client in Windows Vista or Windows 7 with user account control enabled. Click Yes to continue with the installation process.