Contents Overview ······································································································································································ 1 Installing the Mac OS iNode ······································································································································ 1 Supported Mac operating systems································································································································
Overview Mac OS iNode intelligent client (hereafter referred to as Mac OS iNode) is a client access software for Mac users. It is used with Ethernet switches or routers, and cooperates with intelligent management center (iMC) User Access Manager Component (UAM)/Endpoint Admission Defense (EAD) to authenticate and check the security of broadband access users. Mac OS iNode supports 802.1X protocol for authenticating users. This document mainly describes how to install, operate, and uninstall the Mac OS iNode.
Installing the Mac OS iNode If the iNode client of an earlier version has been installed on the PC, uninstall it before installing a new version. Supported Mac operating systems The following Mac operating systems support the Mac OS iNode: • Mac OS 10.4 • Mac OS 10.5 • Mac OS 10.6 Installing the Mac OS iNode through GUI The Mac OS 10.6 is used to exemplify how to install Mac OS iNode through the graphical user interface (GUI).
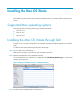
Figure 2 Decompress the installation file Figure 3 shows the decompressed files. iNodeClient is the installation program. Figure 3 Installation program Step4 Double click iNodeClient to open the installation guide, as shown in Figure 4.
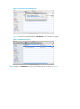
Figure 4 Mac OS iNode installation guide Step5 Click Continue to enter the Select Destination page as shown in Figure 5. Figure 5 Select a destination volume Step6 Specify the volume to install iNode, which will then be installed under /Applications/iNodeClient/ on the specified volume. Step7 Click Continue to enter the Installation Type page as shown in Figure 6.
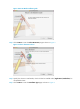
Figure 6 Installation information Step8 Type your username and password, and click OK. Figure 7 Type your username and password Step9 Confirm the installation settings, and click Install.
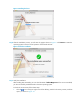
Figure 8 Installing the client Step10 After the installation process, you will enter the page as shown in Figure 9. Click Restart to restart the operating system to ensure normal operation of the iNode software. Figure 9 Finish the installation Step11 Verify the installation. After installing Mac OS iNode, you can check the status of AuthenMngService. If this service is enabled, you have successfully installed iNode on the Mac operating system. To check the service status, follow these steps: 1.
Figure 10 Search for the activity monitor 2. Search for AuthenMngService. In the Activity Monitor page, select All Processes and then search for AuthenMngService. If you can see AuthenMngService displayed in the Process Name column as shown in Figure 11, you have successfully installed Mac OS iNode.
Using Mac OS iNode for authentication To use Mac OS iNode for authentication, follow these steps: Step1 Enter the installation directory of Mac OS iNode, which is /apple/Applications/iNodeClient/ in this example. NOTE: Mac OS iNode must be installed under the directory of /x/Applications/iNodeClient/, where x indicates the volume. Figure 12 Installation directory of Mac OS iNode Step2 Double click iNodeClient to enter the iNode configuration page as shown in Figure 13.
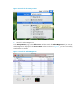
Figure 13 Mac OS iNode configuration page Step3 Click the icon on the upper left corner of the configuration page as shown in Figure 13 to enter the authentication connection configuration page, as shown in Figure 14.
Step4 Step5 Configure the parameters for the connection. • If the PC on which the Mac OS iNode is installed has multiple NICs or virtual NICs, the Select NIC option shown in Figure 14 must be set to the NIC used for access authentication. • Other parameters should be configured following the suggestion of the network administrator because they are closely related with the network environment. Right-click the connection icon and select Connect.
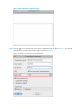
Figure 16 Successful authentication
Uninstalling Mac OS iNode To uninstall Mac OS iNode, follow these steps: Step1 Click the 17. icon on the upper right corner of the desktop and search for the terminal, as shown in Figure Figure 17 Search for the terminal Step2 Execute the ./uninstall.sh command to uninstall Mac OS iNode. The password allowing the administrator to log in to the operating system is required during the uninstallation process, as shown in Figure 18.
Figure 18 Uninstall Mac OS iNode