
HP IBRIX X9720 Network Storage System Capacity Block Installation Instructions (AW549-96036, June 2012)


power cords to the X9700cx first, and then connect
the power cords to the X9700c.
IMPORTANT: If your X9720 Network Storage
System cabinet contains more than two capacity
blocks, you must connect all the PDUs to a
power source.
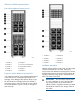
Step 6—Power on the X9700c and X9700cx
components
Power on the X9700cx first, then power on the
X9700c.
Step 7—Discover the capacity block and validate
firmware versions
1. Power on the capacity block by first powering on
the X9700cx enclosure followed by the X9700c
enclosure. Wait for the seven-segment display on
the rear of the X9700c to read on. This can take
a few minutes.
2. If necessary, update the firmware of the new
capacity block. See firmware release notes for
more information.
3. Run the exds_stdiag command on every blade
to validate that the new capacity block is visible
and that the correct firmware is installed. See the
HP IBRIX X9720/X9730 Network Storage System
Administrator Guide for more information about
the command output.
4. To enable the X9720 system to use the new
capacity, there must be entries for each LUN in
/dev/cciss on each file serving node. To
determine whether the operating system on each
file system node has recognized the new capacity,
run this command:
ll /dev/cciss/c0d* | wc -l
The result should include 11 LUNs for each 82-TB
capacity block, and 19 LUNs for each 164-TB
capacity block.
If the LUNs do not appear, take these steps:
• Run the hpacucli rescan command.
• Check /dev/cciss again for the new
LUNs.
• If the LUNs still do not appear, reboot the
nodes.
IMPORTANT: If you added the capacity block
to an existing system that must remain online,
be sure to use the procedure “Performing a
rolling reboot,” described in the HP IBRIX
X9720/X9730 Network Storage System
Administrator Guide. If you added the capacity
block to an existing system that is offline, you
can reboot all nodes at once.
The capacity block is pre-configured in the factory with
data LUNs; however, there are no logical volumes
(segments) on the capacity block. To import the LUNs
and create segments, take these steps:
1. Run the ibrix_pv command to import the LUNs.
2. Run the ibrix_pv -p -h command to verify
that the LUNs are visible to all servers.
3. Run the ibrix_fs command to bind the
segments and expand (or create) file systems.
For more information about creating or extending
file systems, see the HP IBRIX X9000 Network
Storage System File System User Guide.
Enabling monitoring for the new storage
The X9720 system starts monitoring capacity blocks
when the vendor storage is registered with X000
Software. Capacity blocks installed after the initial
vendor storage registration are not monitored by the
system, which can potentially result in unnoticed
events.
To enable monitoring of the new storage, complete
the following steps:
1. Identify the name of the registered vendor storage:
ibrix_vs –l
Un-register the existing vendor storage:
ibrix_vs –d –n STORAGENAME
2. Register the vendor storage. In the command, the
IP, USERNAME, and PASSWORD are for the OA.
ibrix_vs –r –n STORAGENAME –t exds –I IP(s) –U USERNAME
–P PASSWORD
For more information about ibrix_vs, see the HP
IBRIX X9000 Network Storage System CLI Reference
Guide.
Setting the chassis name of the new capacity block
The chassis name is typically set to the lowest available
number. For example, if the system previously had two
capacity blocks, the new capacity block should be
named 03. To set the chassis name, complete these
steps:
Page 5