
HSG80 ACS Solution Software Version 8.7 for Compaq OpenVMS Installation and Configuration Guide

FC Configuration Procedures
5–16 HSG80 ACS Solution Software Version 8.7 for Compaq OpenVMS Installation and
Configuration Guide
15. Turn on the switches if not done previously.
If you want to communicate with the FC switches through Telnet, set an IP
address for each switch. See the manuals that came with the switches for details.
Plug in the FC Cable and Verify Connections
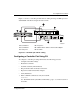
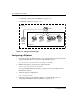
16. Plug the FC cable from the first host adapter into the switch. Enter a SHOW
CONNECTIONS
command to view the connection table:
SHOW CONNECTIONS
The first connection will have one or more entries in the connection table. Each
connection will have a default name of the form !NEWCONxx, where xx is a
number representing the order in which the connection was added to the
connection table.
For a description of why plugging in one adapter can result in multiple
connections, see “Numbers of Connections,” page 1–10.
17. Rename the connections to something meaningful to the system and easy to
remember. For example, to assign the name ANGEL1A1 to connection
!NEWCON01, enter:
RENAME !NEWCON01 ANGEL1A1
StorageWorks recommends using a naming convention, see “Naming
Connections,” page 1–10.
18. Specify the operating system for the connection:
SET ANGEL1A1 OPERATING_SYSTEM=VMSAIX_CAMBEX
19. Verify the changes:
SHOW CONNECTIONS
Mark or tag all Fibre Channel cables at both ends for ease of maintenance.
Repeat Procedure for Each Host Adapter Connection
20. Repeat steps 17, 18, and 19 for each of that adapter’s host connections or delete
the unwanted connections from the table.
21. For each host adapter, repeat steps 16 through 20.