
HSG60 and HSG80 Controller and HSx80 Cache Module Replacement Procedures for Array Controller Software V8.7x-x Release Notes
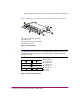


Replacing HSx80 Cache Modules in Single and Dual-Redundant Controller Configurations
36 HP StorageWorks HSG60 and HSG80 Controller and HSx80 Cache Module Replacement
Procedures for Array Controller Software V8.7x-x Release Notes
Replacing HS
x
80 Cache Modules in Single Controller Configurations
Complete the steps in the following subsections to replace HSx80 cache modules
in single controller configurations.
Caution: Static electricity can easily damage the cache module or a DIMM.
Wear a snug-fitting, grounded ESD wrist strap when completing controller
cache module removal and installation procedures.
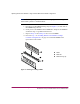
Removing HS
x
80 Cache Modules from Single Controller Configurations
Perform the following steps to remove a cache module in a single controller
configuration.
1. Determine whether the controller is operational, and then complete one of the
following two options:
■ Connect a PC or terminal to the controller maintenance port if the
controller is operational, and then proceed to step 2 below.
■ Proceed to step 6 if the controller is not operational.
2. From the host console, stop all host activity to the controller, and dismount
the logical units in the subsystem.
3. If you are using Microsoft Windows 2000 or Windows NT, shut down the
server.
4. Run the FMU to obtain the last failure codes, if necessary.
5. Shut down “this controller” by entering the following command:
SHUTDOWN THIS_CONTROLLER
Proceed to the next step only after the Reset button stops flashing and remains
on.
Note: After the controller shuts down, the Reset button and the first three port LEDs
light up. This might take several minutes to happen, depending on the amount of data
that needs to be flushed from the cache module.
6. For the cache module to be replaced, complete one of the following two
options: