Release Notes hp StorageWorks HSG60 and HSG80 Controller and HSx80 Cache Module Replacement Procedures for Array Controller Software V8.7x-x Product Version: V8.7, V8.7-1, V8.7-2, V8.7-3 First Edition (October 2003) Part Number: AA–RUQ2A–TE This document details updated procedures for replacing HSG60 and HSG80 controllers and HSx80 cache modules that use Array Controller Software (ACS) V8.7x-x. For the latest Release Notes versions and related information, see the HP storage website at http://h18006.www1.
© Copyright 2001–2003 Hewlett-Packard Development Company, L.P. Hewlett-Packard Company makes no warranty of any kind with regard to this material, including, but not limited to, the implied warranties of merchantability and fitness for a particular purpose. Hewlett-Packard shall not be liable for errors contained herein or for incidental or consequential damages in connection with the furnishing, performance, or use of this material. Microsoft®, MS Windows®, Windows®, and Windows NT® are U.S.
About this Document About this Document This section covers the following subsections: ■ Release Notes Information, page 3 ■ Intended Audience, page 3 ■ Other Documentation, page 4 Release Notes Information These Release Notes cover the following major topics: ■ What’s New, page 5 ■ Special Considerations, page 7 ■ Replacing HSG60 and HSG80 Controllers in Single and Dual-Redundant Controller Configurations, page 14 ■ Replacing HSx80 Cache Modules in Single and Dual-Redundant Controller Configu
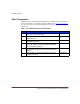
About this Document Other Documentation Additional and recently published documentation, including white papers and best practices documents, are available through the HP website at http://www.hp.com. You may also refer to the ACS documents listed in Table 1 for other pertinent information. Table 1: List of Related Documents and Part Numbers Item 4 Document Title Part Number 1 HP StorageWorks HSG80 Array Controller V8.
What’s New What’s New These Release Notes address procedural enhancements for replacing any of the following HP hardware devices that use ACS V8.7x-x. HP StorageWorks HSG80 controller. ■ HP StorageWorks HSG60 controller ■ HP StorageWorks HSx80 cache module Note: The information in these Release Notes supersede all other HSG60 and HSG80 controller and HSx80 cache module replacement procedures, including procedures detailed in the HP StorageWorks HSG80 Array Controller V8.7 Maintenance and Service Guide.
What’s New — The baud rate for the replacement controller changes to 9600 after the Port #5 button reset during the replacement controller installation. — FRUTIL inhibits you from selecting the option to install both controller and cache module on the Install options menu. Refer to the “Software Anomalies” section on page 59 for information on anomalies associated with ACS V8.7x-x. 6 HP StorageWorks HSG60 and HSG80 Controller and HSx80 Cache Module Replacement Procedures for Array Controller Software V8.
Special Considerations Special Considerations Before using the procedures covered in these Release Notes, review the following subsections: ■ Replacing Modules When Both Controller and Cache Module Have Been Removed, page 7 ■ ACS Versions Affected, page 8 ■ Enclosures, page 8 ■ Replacement Controller Configuration and Cache Module Prerequisites, page 10 ■ Controller Replacement in DRM Configurations, page 10 ■ Technical Support, page 13 Replacing Modules When Both Controller and Cache Module Ha
Special Considerations ACS Versions Affected The information in these Release Notes applies to the following ACS versions: ■ ACS 8.7F ■ ACS 8.7G ■ ACS 8.7L ■ ACS 8.7P ■ ACS 8.7S ■ ACS 8.7-1F ■ ACS 8.7-1G ■ ACS 8.7-1L ■ ACS 8.7-1P ■ ACS 8.7-1S ■ ACS 8.7-2F ■ ACS 8.7-2G ■ ACS 8.7-2L ■ ACS 8.7-2P ■ ACS 8.7-2S ■ ACS 8.7-3F ■ ACS 8.7-3G ■ ACS 8.7-3L ■ ACS 8.7-3P ■ ACS 8.7-3S Caution: Do not use the procedure in these Release Notes with any other controller ACS version.
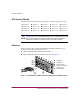
Special Considerations 1 2 3 4 1 2 3 5 4 Controller A Controller B Cache module A Fiber optic cables with extender clips Cache module B 5 Figure 2: Dual-redundant controller and cache module setup in a M2100/M2200 enclosure HP StorageWorks HSG60 and HSG80 Controller and HSx80 Cache Module Replacement Procedures for Array Controller Software V8.
Special Considerations Replacement Controller Configuration and Cache Module Prerequisites Note the following prerequisites before starting replacement procedures: ■ Hardware Compatibility—The replacement controller hardware must be compatible with the remaining controller hardware. Refer to product-specific release notes and documentation for information regarding hardware compatibility.
Special Considerations Site "x" New controller shipped from manufacturing Controller acquired from inventory/ field office Controller has a known configuration Controller has an unknown configuration Offline system exists? Yes Initialize controller No Replacing target controller or unknown controller? Yes Halt I/O on initiator and target, and pull Fibre cable on initiator controller No Proceed to instruction for removing & installing a controller for a dual-redundant configuration Figure 3: Co
Special Considerations b. Complete step 1 through step 7 of the “Installing an HSG60 or HSG80 Controller in Dual-Redundant Controller Configurations” section (which starts on page 26) to initialize the replacement controller in the non-DRM-configured subsystem. The replacement controller is initialized with no configuration. c. Remove the replacement controller from the non-DRM-configured subsystem. d.
Special Considerations Replacing a Controller With a Known Status Perform the following procedures when the configuration of the replacement controller is known. 1. Determine whether the controller to be replaced is a target controller, and then complete one of the following options: ■ Proceed to the “Replacing HSG60 and HSG80 Controllers in Dual-Redundant Controller Configurations” which starts on page 20 if the controller to be replaced is not a target controller.
Replacing HSG60 and HSG80 Controllers in Single and Dual-Redundant Controller Configurations Replacing HSG60 and HSG80 Controllers in Single and Dual-Redundant Controller Configurations Use the procedures in this section to replace a controller in either single or dual-redundant controller configurations.
Replacing HSG60 and HSG80 Controllers in Single and Dual-Redundant Controller Configurations Figure 4: Connecting PC and terminal cables to the controller maintenance port (dual-redundant configuration shown) 2. From the host console, halt all host activity to the controller, and dismount the logical units in the subsystem. 3. If you are using Microsoft® Windows® NT® or Windows 2000, shut down the server. 4. Run the Fault Management Utility (FMU) to obtain the last failure codes, if necessary. 5.
Replacing HSG60 and HSG80 Controllers in Single and Dual-Redundant Controller Configurations 6. Shut down “this controller” with the following command: SHUTDOWN THIS_CONTROLLER Note: After the controller shuts down, the Reset button and the first three LEDs turn on (see Figure 5). This might take several minutes to occur, depending on the amount of data that needs to be flushed from the cache module. Proceed only after the Reset button stops flashing and remains on.
Replacing HSG60 and HSG80 Controllers in Single and Dual-Redundant Controller Configurations 1 1 Program card slot Eject button Figure 6: Removing the controller ESD cover 8. Disconnect all host bus cables or terminators from the controller. Note: Use thin needle nose pliers to disconnect the cables if the extender clips are not installed on the optical cables. 9. If connected, disconnect the PC or terminal from the controller maintenance port. 10.
Replacing HSG60 and HSG80 Controllers in Single and Dual-Redundant Controller Configurations Installing a Controller in Single Controller Configurations Perform the following steps to install a controller in a single controller configuration. Caution: Carefully align the controller in the appropriate guide rails. Misalignment could damage the backplane. Note: Ensure that the program card is not installed in the controller. 1.
Replacing HSG60 and HSG80 Controllers in Single and Dual-Redundant Controller Configurations 8. Display details about the configured controller by entering the following command: SHOW THIS_CONTROLLER FULL 9. Determine whether the cache is good, and then perform one of the following options: ■ Refer to Table 3 through Table 5, as applicable, if the cache is not good. ■ Proceed to the next step if the cache is good. 10.
Replacing HSG60 and HSG80 Controllers in Single and Dual-Redundant Controller Configurations 16. Disconnect the PC or terminal from the controller maintenance port. 17. Install the program card ESD cover (see Figure 6 on page 17). Replacing HSG60 and HSG80 Controllers in Dual-Redundant Controller Configurations Follow the instructions in this subsection to remove or replace an HSG60 or HSG80 controller in a dual-redundant controller configuration. Caution: With ACS V8.7, V8.7-1, and V8.
Replacing HSG60 and HSG80 Controllers in Single and Dual-Redundant Controller Configurations Removing an HSG60 or HSG80 Controller in Dual-Redundant Configurations Perform the following steps to remove a controller in a dual-redundant controller configuration. 1. If the controller to be replaced ( ) is functional, complete the following substeps. Otherwise, go to step 2 below. a. Connect a PC or terminal to the maintenance port of the controller. b.
Replacing HSG60 and HSG80 Controllers in Single and Dual-Redundant Controller Configurations d. Verify that the I/O for the controller that is being replaced fails over to the operational controller (see step 1d above) by entering the following command: RUN VTDPY Note: In Transparent Failover mode, units that failed over due to a RESTART command will revert back to preferred controller after about 1 minute. e. Exit VTDPY by pressing Ctrl+Y. f.
Replacing HSG60 and HSG80 Controllers in Single and Dual-Redundant Controller Configurations FRUTIL Main Menu: 1. Replace or remove a controller or cache module 2. Install a controller or cache module 3. Replace a PVA module 4. Replace an I/O module 5. Exit Enter choice: 1,2,3,4,5 -> Figure 8: FRUTIL Main Menu for a controller in a BA370 FRUTIL Main Menu 1. Replace or remove a controller or cache module 2. Install a controller or cache module 3. Replace an I/O module 4.
Replacing HSG60 and HSG80 Controllers in Single and Dual-Redundant Controller Configurations [ [ [ [ Slot Designations (BA370) (front view) ---- EMU ---- ][ ---- PVA ---- ] ---------Controller A -------- ] ---------Controller B -------- ] Cache Module A ] [ Cache Module B ] Figure 11: Slot Designations screen for controllers in a BA370 enclosure [ [ [ [ [ Slot Designations M2100/M2200 (back view) Port1 ] [ Port3 ] [ Port5 ] Port2 ] [ Port4 ] [ Port6 ] --------Controller A -------- ] --------Controller
Replacing HSG60 and HSG80 Controllers in Single and Dual-Redundant Controller Configurations 5. For the controller to be replaced, complete the following substeps: Caution: Use thin needle-nose pliers to remove the cable from the controller without potentially damaging the cable for fiber optic cables without extender clips. a. Disconnect all host bus cables from the controller being removed. b.
Replacing HSG60 and HSG80 Controllers in Single and Dual-Redundant Controller Configurations Installing an HSG60 or HSG80 Controller in Dual-Redundant Controller Configurations Perform the following steps to install a controller in a dual-redundant controller configuration if only the controller is not installed.
Replacing HSG60 and HSG80 Controllers in Single and Dual-Redundant Controller Configurations H H H f. Press and hold the Port #5 button. g. Release the Reset button, while continuing to hold the Port #5 button, until the OCP LEDs read 33. 3. For the replacement controller, complete the following substeps to install and remove ACS patches: Note: In the following substeps, all nonapplicable patches are removed from the replacement controller, and ACS V8.7-2 and V8.7-3 patches are applied. H a.
Replacing HSG60 and HSG80 Controllers in Single and Dual-Redundant Controller Configurations 4. For the operational controller, complete the following substeps: a. Connect a PC or terminal to the maintenance port of the operational controller if not already connected. Note: The controller connected to the PC or terminal becomes “this controller.” The controller being removed becomes the “other controller.” b.
Replacing HSG60 and HSG80 Controllers in Single and Dual-Redundant Controller Configurations Install Options: 1. Other controller and cache module 2. Other controller module 3. Other cache module 4. Exit NOTE: OPTION 1 DISABLED (So: Do cache, then controller.) Enter choice: 1,2,3,4 -> Figure 14: Install Options Screen (as displayed using ACS V8.7-3) f.
Replacing HSG60 and HSG80 Controllers in Single and Dual-Redundant Controller Configurations H 5. For the replacement controller, complete the following substeps: H a. Remove the program card in the replacement controller if it is installed. H b. Insert the replacement controller (without the program card installed) into the appropriate bay, and engage the controller retaining levers. H c. Press and hold the Reset button, insert the program card, and continue holding the Reset button. H d.
Replacing HSG60 and HSG80 Controllers in Single and Dual-Redundant Controller Configurations Note: If Enter or Return is not pressed within 3 minutes in substep 6a above, the operational controller issues an automated command to cancel the installation of the replacement controller. This cancellation causes all the port LEDs on the replacement controller to go off.
Replacing HSG60 and HSG80 Controllers in Single and Dual-Redundant Controller Configurations H c. Verify that the controller restarts in the following reset configuration by entering the following command: SHOW THIS_CONTROLLER H H H H — Verify that the controller prompt displays HSG>. — Verify that the NODE_ID is 0000-0000-0000-0000. — Verify that mirrored cache matches the original configuration. — Verify that the controller cache is good.
Replacing HSG60 and HSG80 Controllers in Single and Dual-Redundant Controller Configurations The above commands copy the subsystem configuration from the operational controller to the controller that failed or is being replaced. c.
Replacing HSx80 Cache Modules in Single and Dual-Redundant Controller Configurations Replacing HSx80 Cache Modules in Single and Dual-Redundant Controller Configurations Replacing a cache module involves transferring the cache memory DIMMs from the failed cache module to the replacement cache module. Use the procedures in this section to replace a cache module in either single or dual-redundant controller configurations. Caution: With ACS V8.7, V8.7-1, and V8.
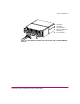
Replacing HSx80 Cache Modules in Single and Dual-Redundant Controller Configurations Figure 15 and Figure 16 provide general information about the cache module. 5 1 ~ 4 2 3 1 2 3 4 5 Cache memory power LED External cache battery (ECB) cable Retaining lever Dual inline memory module (DIMM) Backplane connector Figure 15: Cache module Note: In Figure 16, the environmental monitoring unit (EMU) and power verification assembly (PVA) modules are present in only HP StorageWorks BA370 enclosures.
Replacing HSx80 Cache Modules in Single and Dual-Redundant Controller Configurations Replacing HSx80 Cache Modules in Single Controller Configurations Complete the steps in the following subsections to replace HSx80 cache modules in single controller configurations. Caution: Static electricity can easily damage the cache module or a DIMM. Wear a snug-fitting, grounded ESD wrist strap when completing controller cache module removal and installation procedures.
Replacing HSx80 Cache Modules in Single and Dual-Redundant Controller Configurations ■ For cache modules in an M2100/M2200 enclosure, disengage both cache module retaining levers, and remove the cache module. ■ For cache modules in a BA370 enclosure, complete the following substeps: a. Disengage both cache module retaining levers, and partially remove the cache module—about halfway. Caution: You must disable the ECB before disconnecting the ECB Y-cable.
Replacing HSx80 Cache Modules in Single and Dual-Redundant Controller Configurations Note: To facilitate pressing down on the DIMM retaining clips, consider using the eraser end of a pencil or a small screwdriver. a. Press down on the DIMM retaining clips (see Figure 17) at both ends of the DIMM being removed. b. Gently remove the DIMM from the DIMM slot, and place the DIMM on an antistatic bag or a grounded antistatic mat. c. Repeat substep 7a and substep 7b above for each DIMM. d.
Replacing HSx80 Cache Modules in Single and Dual-Redundant Controller Configurations Installing HSx80 Cache Modules in Single Controller Configurations Perform the following steps to install a cache module in a single controller configuration. Note: The replacement cache modules must contain the same memory configuration as that of the cache module which was removed. 1.
Replacing HSx80 Cache Modules in Single and Dual-Redundant Controller Configurations 5. Restart the controller by pressing the Reset button. Note: A controller restart can take as long as 60 seconds, indicated by the temporary cycling of the port LEDs and a flashing Reset button. Note: If the controller did not restart, use the following steps: 1. Press and hold the Reset button. 2. Reseat the controller program card. 3. Release the Reset button. 6.
Replacing HSx80 Cache Modules in Single and Dual-Redundant Controller Configurations Replacing HSx80 Cache Modules in Dual-Redundant Controller Configurations To remove or replace an HSx80 cache module in a dual-redundant controller configuration, perform the instructions below. Caution: ESD can easily damage the cache module or a DIMM. Wear a snug-fitting, grounded ESD wrist strap when completing controller cache module removal and installation procedures.
Replacing HSx80 Cache Modules in Single and Dual-Redundant Controller Configurations 2. For the operational controller, complete the following substeps: a. Connect the PC or terminal to the maintenance port of the operational controller. Note: The controller connected to the PC or terminal becomes “this controller.” The controller for the cache module being removed becomes the “other controller.” b.
Replacing HSx80 Cache Modules in Single and Dual-Redundant Controller Configurations Note: A countdown timer allows you a total of 2 minutes to remove the cache module. After 2 minutes, “this controller” will exit FRUTIL , restart the "other controller,” and resume operations. If this happens, perform the following steps: 1. Connect the PC or terminal to the "other controller." 2. Shut down the "other controller" by issuing the command: SHUTDOWN THIS_CONTROLLER 3.
Replacing HSx80 Cache Modules in Single and Dual-Redundant Controller Configurations 6. For the cache module to be replaced, note the location for each DIMM in the cache module that was replaced, and install the DIMMs in the corresponding locations in the replacement cache module. Use the following substeps to remove the DIMMs: Note: The DIMMs must be removed for installation in the replacement cache module. a.
Replacing HSx80 Cache Modules in Single and Dual-Redundant Controller Configurations Installing an HSx80 Cache Module in Dual-Redundant Controller Configurations Perform the following steps to install an HSx80 cache module in a dual-redundant controller configuration. Caution: ESD can easily damage a cache module or a DIMM. Wear a snug-fitting, grounded ESD wrist strap. Note: The replacement cache module must contain the same cache memory configuration as the module being replaced.
Replacing HSx80 Cache Modules in Single and Dual-Redundant Controller Configurations Note: The controller connected to the PC or terminal becomes “this controller.” The controller for the replacement cache module becomes the “other controller.” b. Start FRUTIL by entering the following command: RUN FRUTIL c. Enter N(o) to the question about replacing the cache battery. d. From the FRUTIL Main Menu, enter 2 for the Install a controller or cache module option.
Replacing HSx80 Cache Modules in Single and Dual-Redundant Controller Configurations FRUTIL quiesces all device ports, indicates a time limit of 2 minutes to install the replacement cache module, and begins displaying the time remaining in 10-second intervals. Caution: Wait for FRUTIL to quiesce the device ports—indicated by an “All device ports quiesced” message. Failure to allow the ports to quiesce can result in data loss. Quiescing might take several minutes.
Replacing HSx80 Cache Modules in Single and Dual-Redundant Controller Configurations 4. For the operational controller, note that in Mirrored mode, FRUTIL initializes the mirrored portion of the replacement cache module, checks for old data on the cache module, and then restarts all device ports. After device ports restart, FRUTIL tests the cache module and the ECB.
Replacing HSx80 Cache Modules in Single and Dual-Redundant Controller Configurations 7. For the operational controller, complete the following substeps: a. Observe that FRUTIL restarts the device ports and then exits. b. Identify invalid or failed cache conditions by entering the following command: SHOW THIS_CONTROLLER c. Clear invalid or failed cache conditions, if any exist. See Table 3 through Table 5 starting on page 52 for more information on clearing invalid or failed cache conditions.
Replacing HSx80 Cache Modules in Single and Dual-Redundant Controller Configurations 9. For the operational controller, complete the following substeps: a. Connect a PC or terminal to the maintenance port. Caution: In substep 9b below, entering the appropriate SET command is critical. Enabling an incorrect Failover mode can cause loss of data and incur system down time. Verify the original failover configuration, and use the appropriate SET command to restore this configuration.
Troubleshooting Troubleshooting This section provides instructions on resolving common problems that may occur while replacing controllers or cache modules.
Troubleshooting Table 3: Resolving an Invalid Cache - Serial Number Mismatch Error Message Description/Instruction Message INVALID CACHE - Cache should be installed in controller serial number xyz %CER-HSG> This controller ( replacement ) has an invalid cache module %CER-HSG> cache modules inconsistent with mirror mode Resolution 1.
Troubleshooting After a SHOW THIS_CONTROLLER or SHOW OTHER_CONTROLLER command is submitted, the controller displays one or both of the following cache conditions: Cache: Cache is GOOD Mirrored Cache: Cache is FAILED Note: This condition cannot be resolved with the CLEAR OTHER_CONTROLLER INVALID_CACHE DESTROY_UNFLUSHED_DATA command. To resolve the error message, see Table 4 on page 54.
Troubleshooting Table 4: Resolving a Failed Cache Error Message (Event 1) Details Message %CER-Atop> This controller (replacement) has an invalid cache module Resolution Caution: If the cache has failed, disable mirrored cache to clear the failed condition. Since unmirroring a controller pair destroys all persistent reservation bits in the controllers, you must halt all host activity to this controller pair before proceeding.
Troubleshooting Table 4: Resolving a Failed Cache Error Message (Event 1) (Continued) Details Resolution (Cont’d) Caution: In step 8, you must break up mirrored cache. Before completing this step, note that breaking up mirrored cache configurations loses persistent reservation conditions on the units in these controllers. Before proceeding with this procedure, inform customers and your manager that you are about to break the mirror cache configuration. 8.
Troubleshooting Table 5: Resolving a Failed Cache Error Message (Event 2) Details Message Resolution %CER-Atop> This controller (replacement) has an invalid cache module Caution: If the cache has failed, you must disable mirrored cache in order to clear the failed condition. Because unmirroring a controller pair will destroy all persistent reservation bits in the controllers, you must halt all host activity to this controller pair before proceeding.
Troubleshooting Resolving Unexpected Bugcheck Condition Error Messages If the replacement controller restarts at the same time that Enter or Return is pressed to terminate FRUTIL on the operational controller, an unexpected bugcheck condition error message can occur. Note: This condition cannot be cleared with CLI commands.
Troubleshooting Table 6: Resolving an Unexpected Bugcheck Condition Error Message (Continued) Resolution Resolution (Cont’d) 6. Set the hardware version and manufacturing level by entering the following command: DANGEROUS X HARDWARE=xyz Note: The xyz in the above command represents the hardware version that is located on the label on the bottom (component side) of the controller board. 7.
Software Anomalies Software Anomalies This section describes software anomalies inherent in ACS V8.7, 8.7-1, and V8.7-2. LED Code 38 When installing a controller, FRUTIL output incorrectly states that the controller halts with LED code 38. The controller actually halts with LED code 33. Installing Both the Controller and Cache Module FRUTIL allows you the option to install both controller and cache module. However, HP recommends that you do not install both the controller and cache module together.