
HP Software File Migration Agent Installation and Administration Guide (September 2009)

52 | Managed Volumes
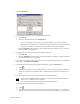
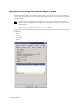
7. Click the Filtering tab.
8. To migrate based on the age of a file, perform the following steps:
a. Select File Age.
b. Select one of the following from the Timestamp list:
• Access—Files that have been accessed more than this number of days ago are migrated.
• Modification—Files that have been modified more than this number of days ago are migrated.
• Creation—Files that were created more than this number of days ago are migrated.
c. From the Elapsed time drop-down lists, set the number of seconds, minutes, hours, or days that
FMA waits before it migrates files.
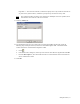
9. To migrate based on the size of a file, perform the following steps:
a. Select File Size.
b. From the Min Filesize drop-down lists, set number of kilobytes, megabytes, or gigabytes that the
file must reach before it can be migrated.
10. If you want to release files as soon as they have been successfully migrated to all archives configured
for the policy, select Release immediately.
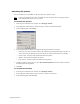
11. To include specific files in this policy, perform the following steps in the Inclusion area:
a. Click .
b. Type the name of the file. You can use the asterisk (*) wildcard to specify none or any number of
characters of any value or the question mark (?) wildcard to specify exactly one character of any
value.
12. To exclude hidden, archive, or system files, select the corresponding checkbox.
Note If you select the Archive checkbox, files that are ready to be archived (files for which the
archive, or “A”, attribute is set) are excluded.
Also, note that excluded files are excluded from statistical summaries.
To exclude specific files, perform the following steps:
a. Click .
b. Type the name of the file. Do not enter the mount point (drive letter, such as “D:”) or the mount
path if the volume is mounted to another volume's directory (“D:\MountPoint”). The path should