
HP Software File Migration Agent Installation and Administration Guide (September 2009)

45
Managed Volumes
When you designate a volume as managed by FMA, its data can be migrated and released to one or more
archives. You can manage any locally attached NTFS volumes with the exception of network drives, system
volumes, and Microsoft cluster quorum disks.
You must designate managed volumes using the FMA user interface, but you can perform other operations
related to the managed volume using the FMA command line interface (FMACLI). For more information
about the FMACLI, see
Command Line Interface Reference on page 81.
When FMA migrates a managed file, it saves a copy to one or more archives associated with the managed
volume. Files can be migrated manually or through the user of policies that define the conditions under
which files are migrated and released.
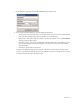
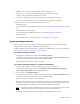
When FMA releases a file, it replaces the file on the file server with a stub file that points to the copies on
the archives. FMA marks the file as offline using the Windows FILE_ATTRIBUTE_OFFLINE flag, which
designates files with remote data. Windows 2008 Offline files can look different compared to
Figure 1:
The Windows FILE_ATTRIBUTE_OFFLINE flag. Offline files typically take up to 4k in file sizes on
the local drive.
Figure 1: The Windows FILE_ATTRIBUTE_OFFLINE flag
After files are migrated or released, users can continue to work with them on the file server. FMA
automatically recalls released files when they are accessed.
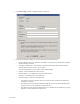
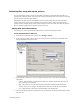
Viewing managed volumes
This section describes how to view a list of managed volumes and information about each volume using the
FMA user interface. You can also view managed volume information from the FMA command line interface
(FMACLI). FMA can support up to 80 managed volumes and display up to 128 drives on the FMA
Configuration pane. Refer to
volume on page 119 for more information.
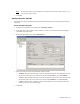
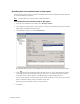
To view the list of volumes on the file server
1. Launch the FMA user interface by selecting All Programs→HP StorageWorks File Migration
Agent
→FMA Configuration from the Windows Start menu.
2. In the left pane, select Managed Volumes.