
HP Software File Migration Agent Installation and Administration Guide (September 2009)


Archives | 29
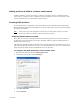
5. Add the technical user account that you established during installation. Give this user Full Control
permissions.
For more information about the technical user account, see Creating a technical user account on page 5.
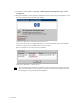
6. Click the Security tab.
7. Add the same technical user account with Full Control permissions.
8. Click OK.
Configuring CIFS archives
After you set up the archive share, you can configure the archive.
Note You can create an archive even if it is currently unavailable. This enables you to create definitions
for archives that may be offline.
To configure a CIFS archive
1. Launch the FMA user interface by selecting All Programs→HP StorageWorks File Migration
Agent
→FMA Configuration from the Windows Start menu.
2. In the left pane, select Archives.
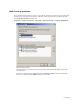
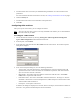
3. In the right pane, right-click and select New archive from the context menu. The Archive Properties
dialog box is displayed.
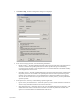
4. In the Archive Properties dialog box, enter the following information:
• Archive name—The name of the archive, which identifies this archive for migration and recall
operations and is used to refer to the archive for command line operations. You cannot include a
space or semi-colon character in the name.
• RSA Module—The module required for FMA to communicate with the archive. Select RSA-
CIFS, which is required for CIFS archives.
• Performance Index—The order in which FMA recalls from this archive. The range is 0-100, and
the default is 100. If a file is stored on multiple archives, FMA attempts to recall it from the archive
with the smallest index number first.
• Description—A description of the archive.
In addition, this dialog box displays the Archive ID, which is the unique, internal reference number for
this archive. It is generated automatically and cannot be modified.