
HP StorageWorks File Migration Agent 2.2.7 release notes


Ensure that the IP address you use is the primary IP address of the FMA server. If you have a
cluster configuration, using the virtual IP address will not work. You will have to generate a
license for each node in your cluster using the primary IP address of each node. Click Next when
you have enter the correct IP address. You will need to repeat this process for each node in your
system.
6. Enter your e-mail address and password, and click Sign-In.
If this is the first time you are signing in to this website, you must create a password at this time.
7. Enter the appropriate contact information, and click Next.
The Password Certificate appears.
8. Scroll down and copy the license key that appears near the bottom of the certificate.
9. Open the C:\Program Files\Common Files\Hewlett-Packard\HPOvLic\data\
LicFile.txt file in a text editing application.
10. On a new line, paste the license key that you copied from the password certificate.
Do not delete the license from LicFile.txt. Make a backup copy of this file.
11.Save and close the LicFile.txt file.
12. Restart the File Migration Agent service.
13. Start FMA by selecting Start > Programs > HP StorageWorks File Migration Agent > FMA
Configuration.
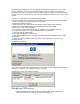
14. Right-click HP File Migration Agent, and select License information to verify that your
permanent license
was entered successfully.
If you have a Cluster license or OpenStorage license, Permanent license appears in the Optional
features box. Otherwise, Not available is shown in the status.
Example of a success cluster license installed:
Standalone FMA server
1. Exit all applications, and close all windows related to FMA. Stop all FMA-related
services to ensure that no jobs are running in the background.