
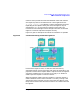
Using the Event Monitoring Service (November 1999)

Chapter 2 29
Selecting Resources to Monitor
Selecting Resources
Selecting Resources
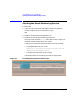
Resources are divided into classes. To select a resource to monitor:
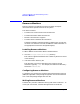
1. From the Event Monitoring Service main screen, click on the
Actions menu.
Refer to the section, “Starting the Event Monitoring Service” on page
30 for instructions on starting EMS.
2. Select Add Monitoring Request
The top-level resource classes for all installed monitors are
dynamically discovered and then listed as shown in Figure 2-2.
Some Hewlett-Packard products include their own monitors within
their product hierarchy. For example, ATM Adapter for HP/9000
Servers, HP OTS 9000 or STM (Support Tools Manager) for HP 9000
hardware monitoring. If this type of product is installed on the
system, then its top-level resource class also appears in the Add or
Copy Monitoring Request screen.
NOTE After installation some monitors must be enabled before their resource
classes appear in the EMS Add or Copy Monitoring Request screen.
For example, the STM hardware monitors. Refer to the documentation
for your monitor for instructions on enabling or starting your monitor.
Similarly, top-level resource classes belonging to user-written
monitors, created using the procedures described in Writing Monitors
for the Event Monitoring Service (EMS) (HP Part Number
B7611-90016), are discovered and displayed here.
To obtain additional information about any particular monitor:
• Review the monitor dictionary file:
a. From the command line, go to the
/etc/opt/resmon/dictionary directory.
Information about each monitor can be found in the .dict files.
b. View the monitor dictionary file.