
HP StorageWorks controller enclosure replacement instructions (514016-001, March 2009)

Installing components into a replacement
controller enclosure
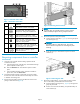
1. A blank label is provided on the replacement controller enclosure
(1, Figure 9) above the OCP. Record the product number and serial
number from the controller being replaced onto the replacement
controller label to ensure the continuation of service entitlement.
Figure 9 Blank label location
2. Using two p eople to lift the replacement controller enclosure, attach
the enclosure onto the cabinet rails, and secure the enclosure to the
cabinet by tightening the front thumbscrews on each side.
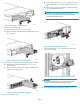
3. Remove the rear memory card access panel, and insert the memory
card that was previously removed from the controller enclosure
being replaced. Reattach the access panel.
4. Slide the two power supplies into the back of the controller
enclosureuntiltheyarefullyseated.
5. Slidethetwoblowersintothefrontenclosureslotsuntiltheir
mounting latches engage.
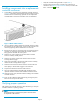
6. Slide each cache battery into the front of the enclosure until fully
seated and the mounting latches engage.
7. Slide the OCP into the front of the enclosure and close the front
OCP display so that the latch engages on the enclosure.
8. Snap the front bezel onto the front of the enclosure.
9. Move the small form-factor pluggable (SFP) modules from the
replaced controller enclosure to the installed controller enclosure.
10. Attach all power, serial, and Fibre Channel c abling to the installed
controller enclosure.
11. Power up the installed controller enclosure by pressing the power
button on the rear power UID bezel.
Verifying proper operation
After replacing the c ontroller enclosure, check the following to verify the
controller enclosure is operating properly:
NOTE:
Wait approximately 10 minutes for the system to check the status
of components in the enclosure.
• Verify the contr
oller h ealth green LED is lit (see Table 1).
• From HP Command V
iew EVA, navigate to the component as
described in the Verifying component failure section, and check th e
status. It should be
(Good).
Page 4